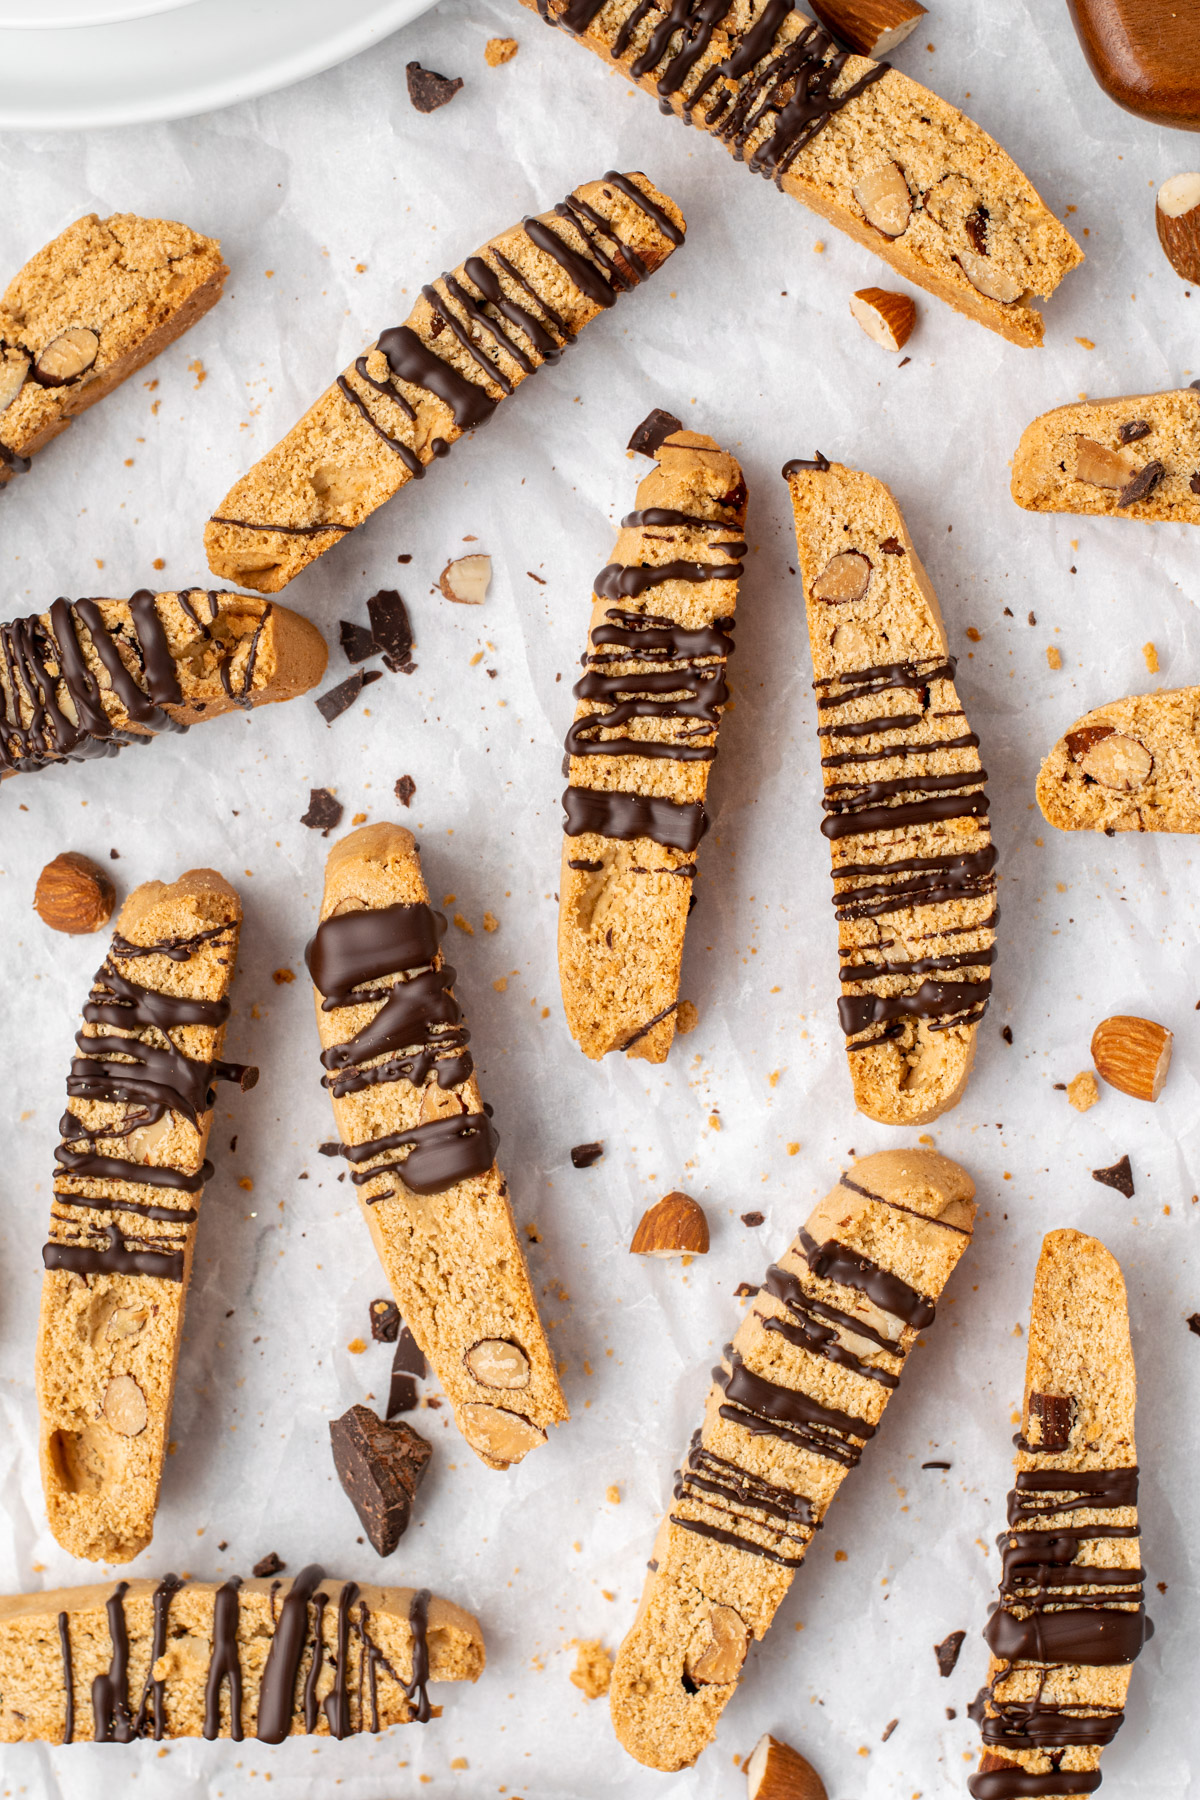
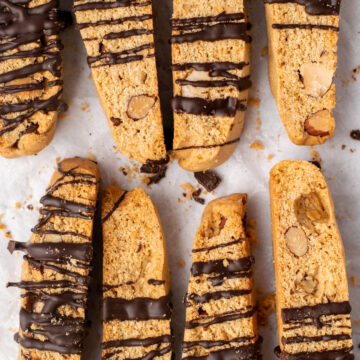
These gluten-free biscotti are crisp, buttery, and perfect with a cup of coffee. Filled with toasted almonds and topped with dark chocolate, these biscotti are sure to impress. Plus they're gluten and dairy-free.

Is there anything better than having a nice hot coffee with a crisp, buttery biscotti on a Saturday morning? How about a gluten-free and dairy-free version!
These gluten-free almond biscotti cookies are crisp, subtly sweet, and oh so delicious. Filled with toasted almonds and topped with a tempered dark chocolate drizzle, these twice-baked Italian cookies are a tasty and impressive treat.
I mean, it's impressive to make normal biscotti, let alone a gluten-free and dairy-free version that is just as delicious (maybe even more 😉). Please read the whole blog post to learn all of my tips and tricks to make successful, impressive, and delicious gluten-free biscotti.
Jump to:
What are Biscotti?
Biscotti (plural) are Italian biscuits that are traditionally very dry, crisp, and typically served with a drink such as wine, coffee, or tea. The word Biscotti actually translates to mean "twice baked", which is the main characteristic that makes the cookies unique.
Biscotti are made from a relatively sticky dough filled with many possible combinations of filling: nuts, dried fruit, extracts, cocoa, chocolate, and more. They are baked in logs, then sliced and baked again to full dry out the biscuits. Baked biscotti are sometimes decorated with a chocolate drizzle or dip.
They are served as a coffee snack or after-dinner dessert with a beverage. The biscotti are typically dipped into the drink for a few seconds to soften the cookie, then enjoyed. The double baking process makes these a time-intensive cookie, making you even more impressive for making homemade gluten-free biscotti.

How Do You Make Gluten-Free Biscotti?
These gluten-free biscotti follow the traditional process for making regular biscotti cookies. A dough is created by combining butter, sugar, eggs, extracts, baking powder, salt, and gluten-free all-purpose flour.
It is important to use a gluten-free flour with xanthan gum in the blend so that these cookies hold together. Toasted almonds are then incorporated into the dough, and often dried fruits accompany as well.
The dough is then shaped into short logs and baked in the oven. The logs cool slightly, then are sliced into 1.5cm thick pieces with a serrated knife. The biscotti are then baked again (Biscotti translating to twice baked) to allow the cookies to fully dry out.
They are then cooled on a wire rack, and drizzled or dipped in melted, tempered chocolate. Biscotti are enjoyed most often with coffee or tea, dipped in the hot drink for a few seconds, soaking up the flavour, and then eaten.
These gluten-free almond biscotti can also be easily made dairy-free, making them the perfectly impressive treat to share with all of your friends and family.
Ingredients
Here is everything you'll need to make these gluten-free almond biscotti:
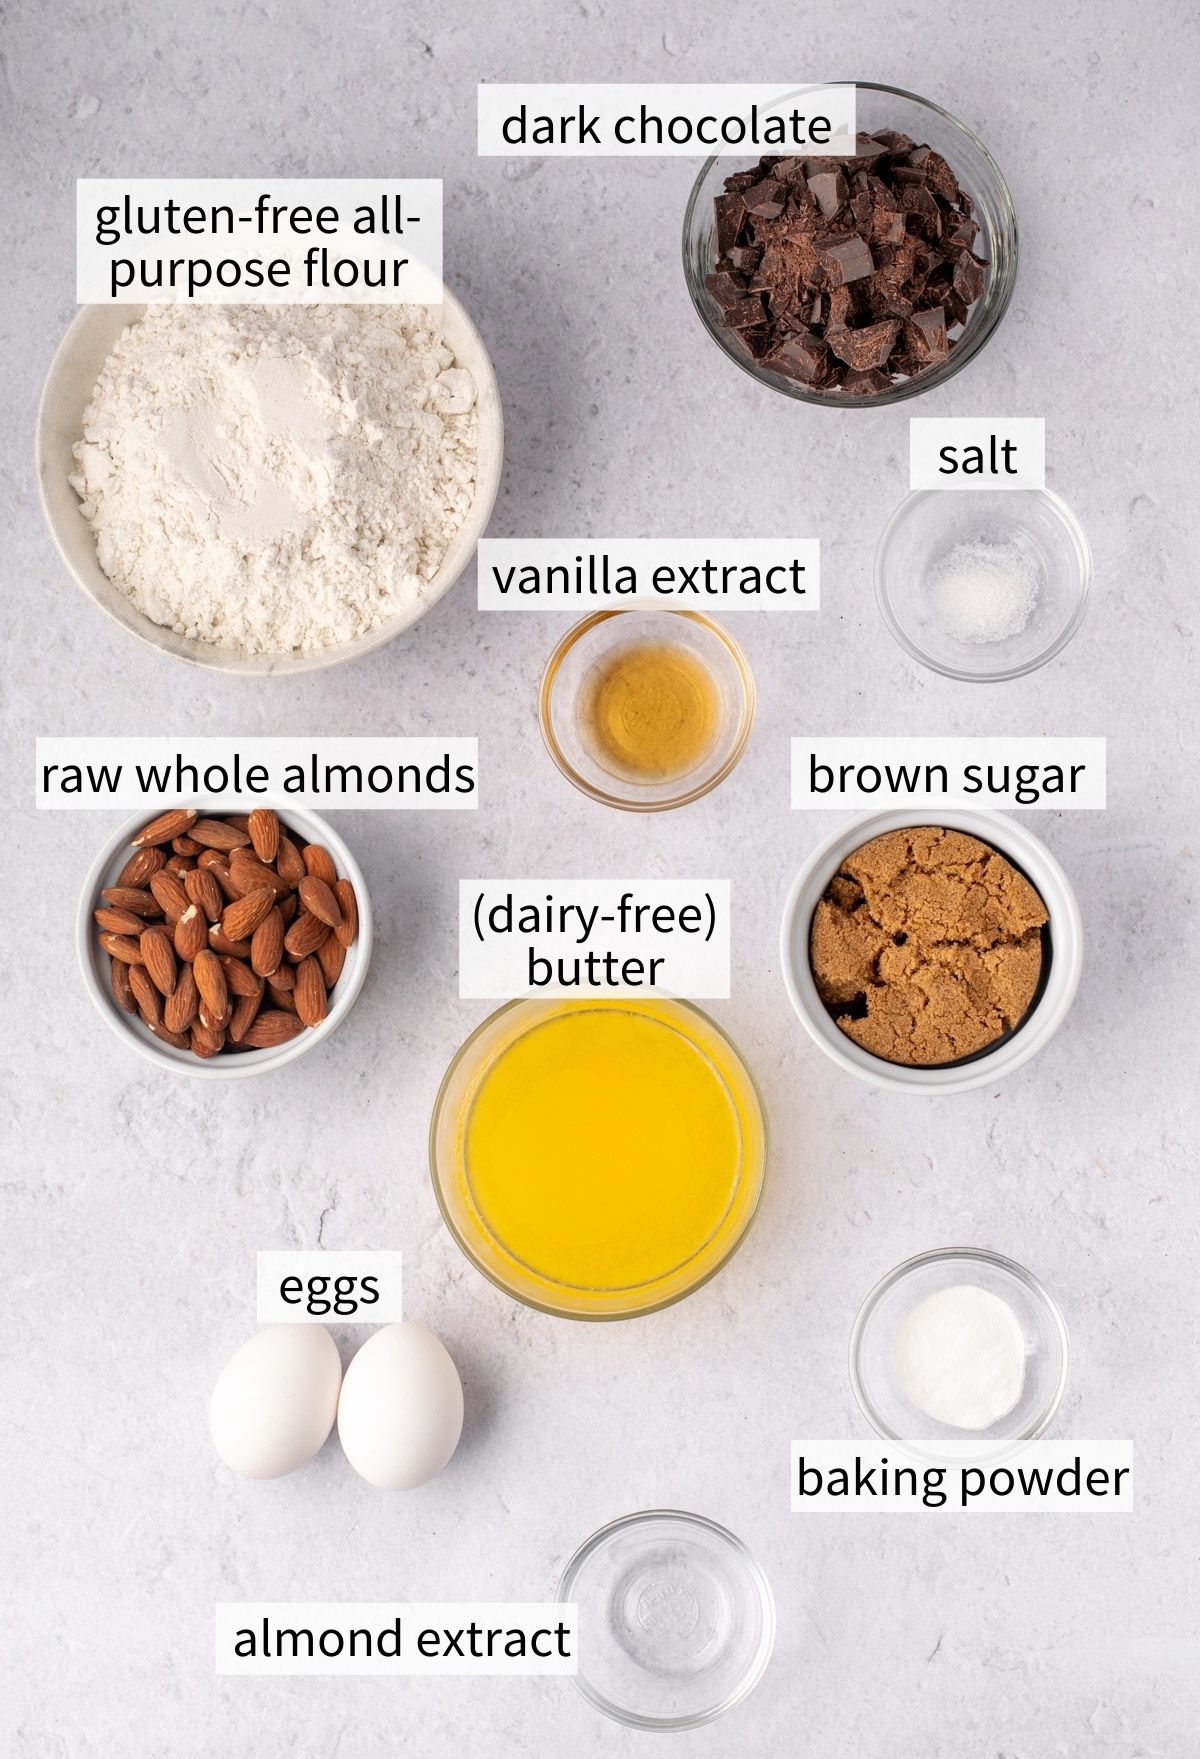
- Whole raw almonds: We will be toasting these ourselves. Almond slivers or pieces could work, but I prefer the whole almonds, as you will see a nice cross section when the biscotti is cut.
- Salted butter: Use dairy-free if preferred. If using unsalted, add an extra ¼ teaspoon salt.
- Brown sugar
- Eggs: At room temperature.
- Vanilla extract
- Almond extract: Optional, but provides a touch more almond flavour.
- Gluten-free all-purpose flour with xanthan gum: I use Bob's Red Mill 1:1 Baking Flour (blue bag).
- Baking powder
- Salt: Add an extra ¼ teaspoon if using unsalted butter.
- 60-70% dark chocolate: Use dairy-free if preferred. Please avoid chocolate chips, as they contain stabilizers that will prevent them from melting and tempering smoothly. I recommend using a nice bar of dark chocolate and chopping it yourself.
Substitutions
These gluten-free almond biscotti were developed to be the most optimal recipe, however there are lots of variations you can make from this recipe. I hope to develop more individual biscotti recipes down the road, but here are some ways you can customize this recipe now:
- Swap the nuts. Use an equal quantity of hazelnuts, pecans, pistachios, or your favourite nut! I still recommend purchasing whole and roasting them for about 10 minutes, then giving them a rough chop. *Note for pistachios that they are most commonly sold as roasted and salted already, so just use those as is. It shouldn't be too salty, I've tried it before and it was great. Just reduce the salt called for in the recipe a smidge.
- Add other mix-ins. Dried fruits are great in biscotti. Dried cranberries, apricots, etc!
- Change or remove the chocolate. I used dark chocolate in this recipe, but feel free to use semi-sweet, milk, or white chocolate. Be sure to read the Sugar Geek Show blog post about tempering, because the type of chocolate will change the maximum temperature!
- Use a new flavouring. Instead of almond extract like this recipe, try using orange extract, or a light amount of peppermint extract.
- Try a new shape. Instead of cutting parallel to the short side of the log, cut diagonally for longer, larger biscotti pieces.

Step-by-Step Instructions
Be sure to read the recipe card below for the full ingredient list and instructions.
Make the biscotti dough
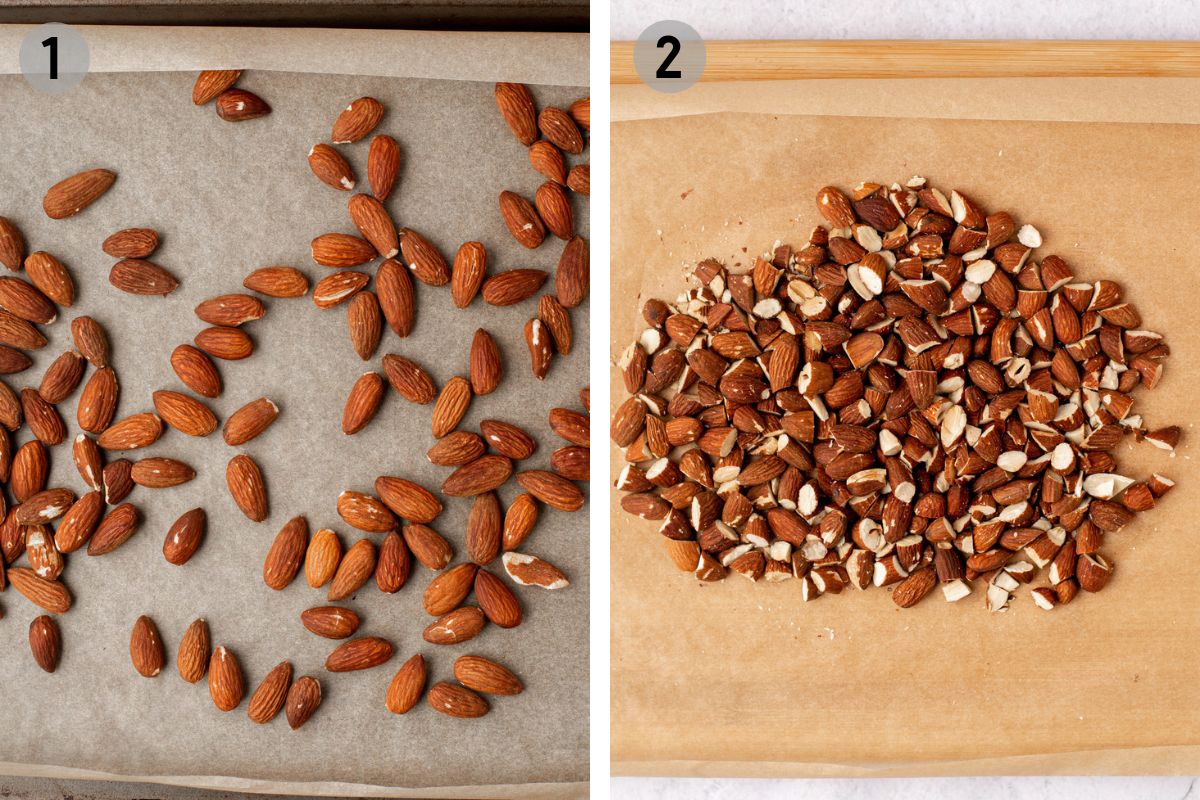
(1) Preheat the oven to 350°F and prepare a rimmed baking sheet with parchment paper. Spread the almonds across the baking sheet in 1 layer. Bake for about 10 minutes, shaking halfway through. Keep an eye on them to prevent burning. They will be darker in colour and smell toasty when done.
(2) Remove and let cool for 5 minutes, then roughly chop. Don't chop too small or you won't see pieces of almond in the biscotti slices. You can leave the oven on while you prepare the dough.
(3) In a medium size bowl, whisk together the melted butter, brown sugar, eggs, vanilla extract, and almond extract until smooth.
Add the flour, baking powder, and salt. Use a rubber spatula to lightly mix the dry ingredients together on top, then fold the dry into the wet to create a homogenous dough.
(4) Fold in the chopped almonds evenly.
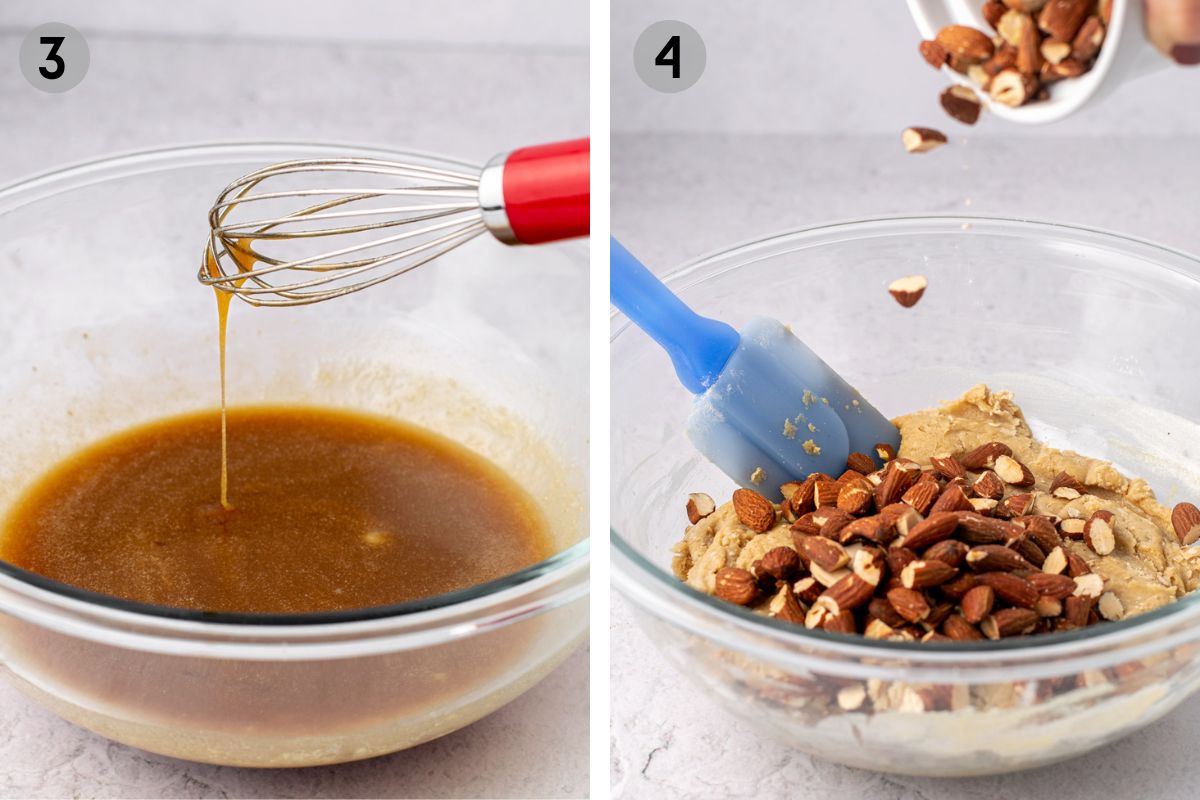
(5) Allow the dough to sit and hydrate for 10 minutes.
Bake the biscotti
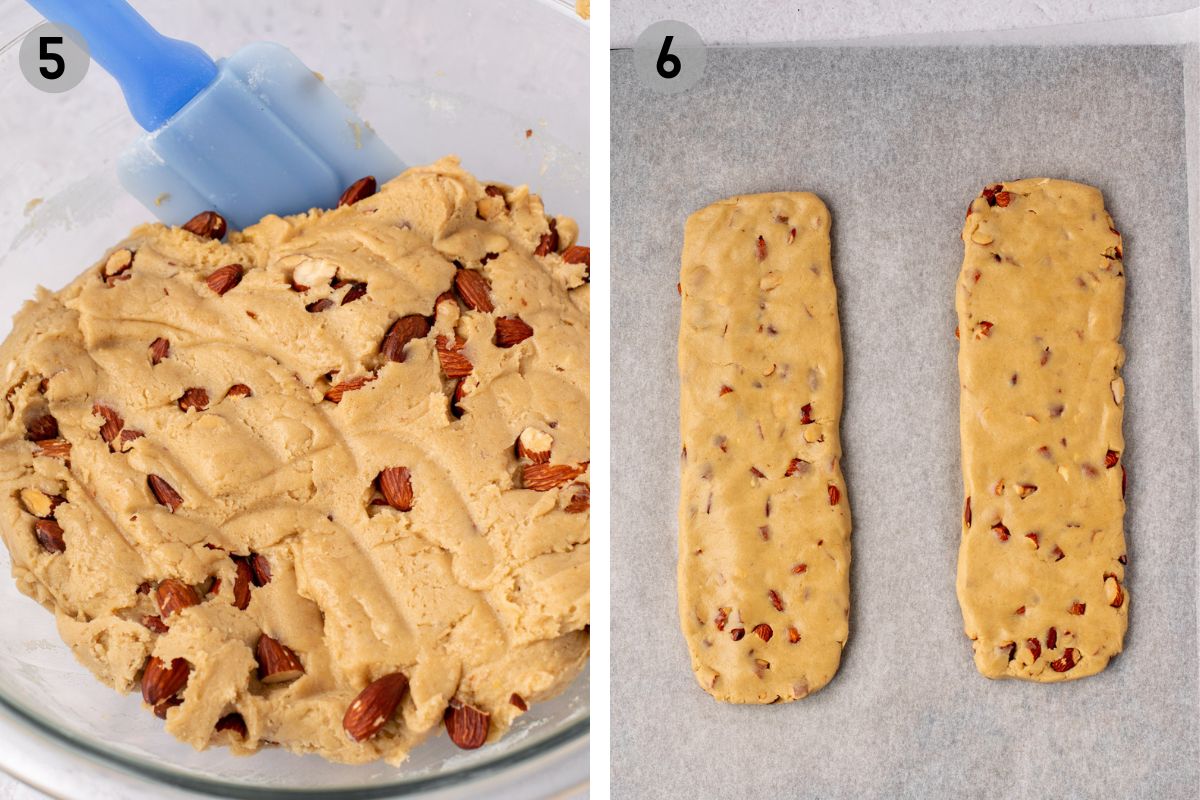
(6) Prepare a large baking sheet (or 2 smaller ones) with parchment paper. Lightly flour your hands and divide the dough in half. If you have a kitchen scale, each half should be approximately 387g.
Place the dough on the parchment paper and use your hands to shape into 2 logs. My logs are approximately 10x20cm and 1.5 cm thick (3"x11" and ⅝" thick).
If you want thicker biscotti, make the logs slightly taller height-wise and shorter length-wise. If you want shorter pieces, make the logs longer and more narrow. Changing the shape may affect the baking time slightly.
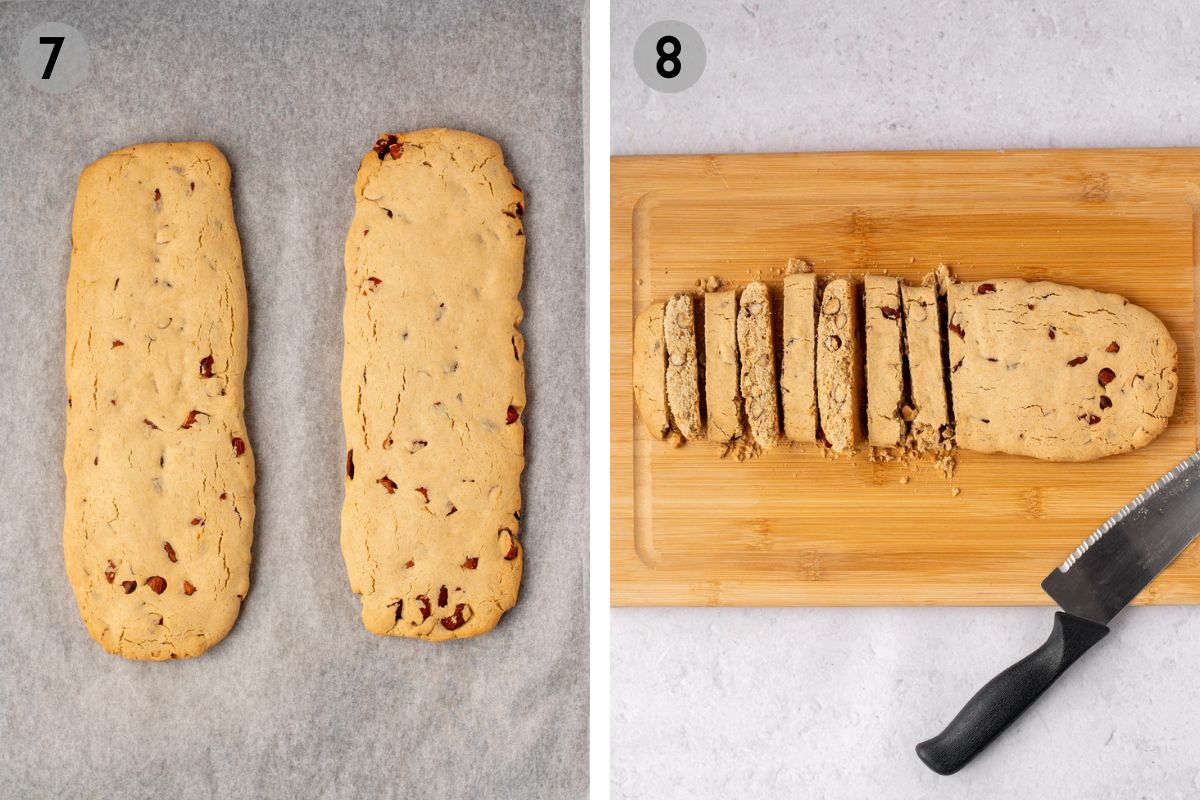
(7) Bake at 350ºF for 28-30 minutes, until dry to the touch. Remove the baking sheet(s) from the oven and allow the logs to cool for 20-25 minutes. Reduce the oven temperature to 285ºF. It is important to let the logs cool, but not too much, before cutting. They can crumble if too hot, and also if too cool.
(8) Gently transfer 1 log to a cutting board if preferred. Use a large, sharp, serrated knife to cut the biscotti log into 1.5cm width slices (⅝"). I like to cut parallel to the short side, down the log. For longer biscotti, you can also cut diagonally.
To cut, gently saw through the log. If I reach a stubborn almond, I will sometimes slice right through. You'll get the hang of it. Don't worry, some breakage if normal. You should get approximately 24-30 biscotti total, depending on thickness and slicing direction.
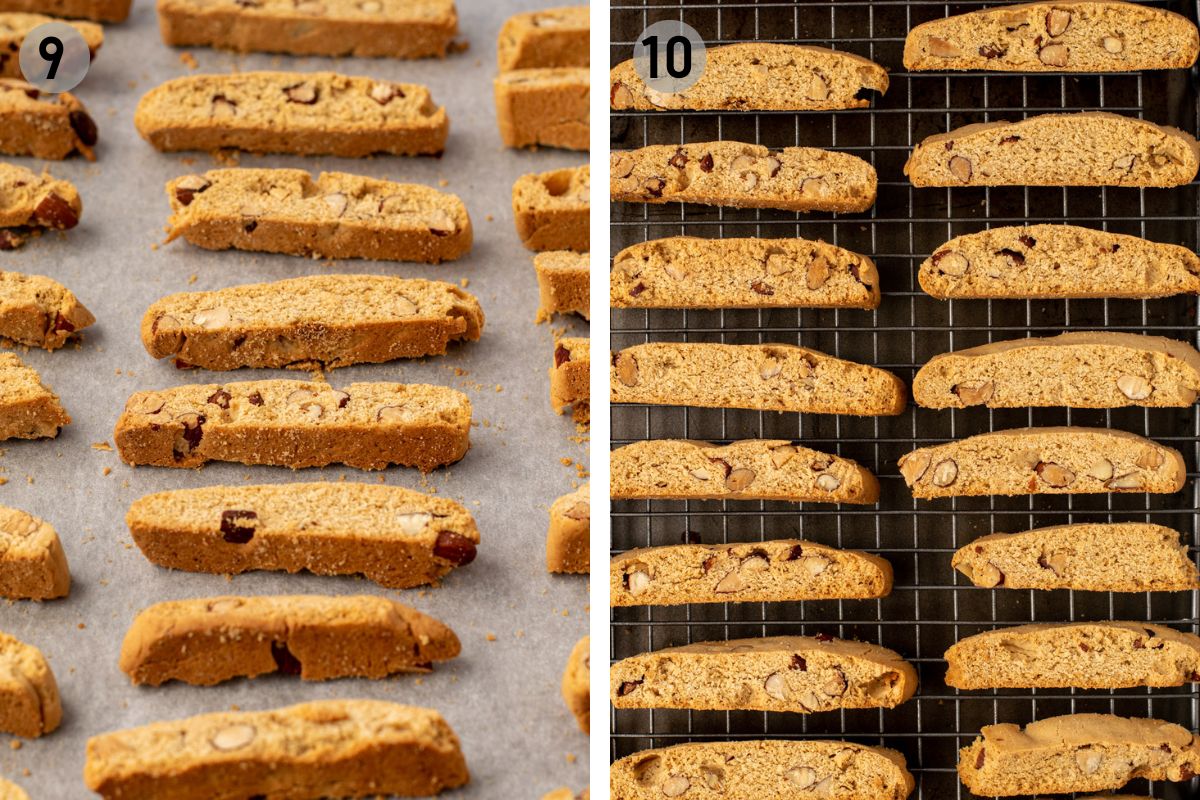
(9) Place the biscotti slices, cut side down, back on the parchment lined baking sheet. Repeat with the other log. Bake at 285ºF for 15-20 minutes, until the top feels dry to the touch.
Then flip all of the biscotti pieces so the bottom side is now on the top. Bake for another 15-20 minutes until dry to the touch. They will be crisp and slightly golden. The biscotti will also dry out more as they cool.
(10) Allow the biscotti to cool on the baking sheet until you are able to handle them, then transfer to a wire rack to cool completely, about 2 hours.
Temper the chocolate
Once the biscotti are fully cooled, you can prepare the chocolate for drizzling or dipping. It is important to temper the chocolate, as this will ensure the chocolate is dry at room temperature and not sticky.
If you are familiar with tempering chocolate, use the method you are most comfortable with. This easy microwave tempering method was learned from Sugar Geek Show.
If you don't feel like tempering the chocolate, you can just melt it in the microwave in 20 second increments, or over a double boiler on the stove. Drizzle over the biscotti as normal. It will harden slightly but remain soft to the touch. Still delicious!
(11) Place the chopped dark chocolate in a plastic or silicone bowl and microwave for 30 seconds. Stir well with a spoon or rubber spatula. Microwave for another 30 seconds, then 15, then 10, then 10 seconds, stirring well in between each heating.
The most important thing is that the chocolate does not go above 90ºF. Use a candy or probe thermometer to check the temperature of the middle of the melted chocolate. If it is ever too hot, keep stirring to incorporate air, and add a few pieces of un-melted chocolate to cool it down.
If necessary, continue with 10 second intervals, stirring and checking the temperature, until smooth. Use the back of your spoon or spatula to spread some melted chocolate on a piece of parchment paper. If it starts to solidify in a few minutes, then your chocolate is good to use.
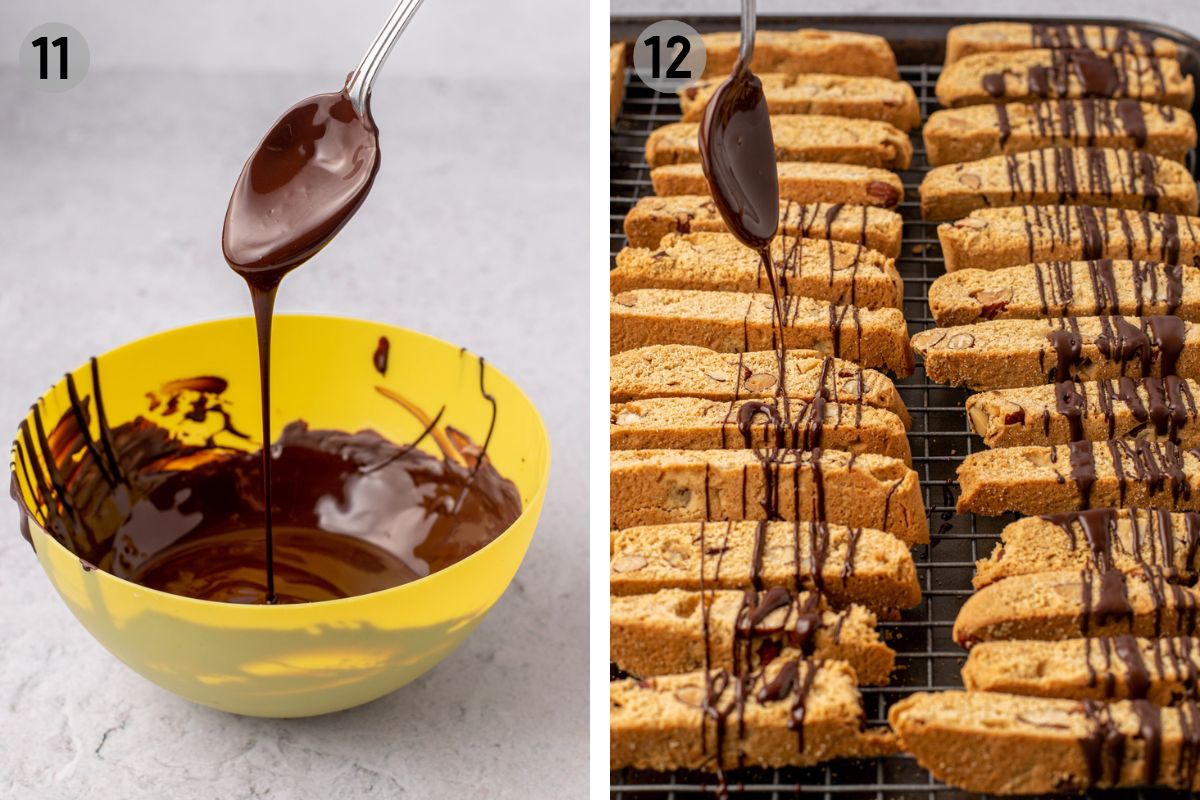
(12) Place the wire rack of biscotti over a piece of parchment paper to catch the drips. Use your spoon to drizzle the melted chocolate over the biscotti. I like to drizzle over half of each piece, so there is a plain side to grab the biscotti. You can also dip the biscotti in the chocolate, but I find this can end up too thick sometimes.
If you have extra chocolate at the end, spread it thin on a piece of parchment paper, wait for it to solidify, then store for future use. Allow the drizzled biscotti to sit at room temperature for 30 minutes for the chocolate to solidify.
Then you are ready to enjoy your homemade gluten-free almond biscotti! Eat as is for a dessert cookie, or dip in a cup of coffee or tea for a sweet snack. See storage instructions below.
Storage & Freezing
Storage Instructions: Biscotti can be stored in an airtight container at room temperature for 1-2 weeks, if they last that long.
Freezing Instructions: Finished biscotti can be frozen in an airtight container for 1-2 months. Thaw at room temperature for several hours. Note that the texture may change slightly.
How to Serve Biscotti
The reason why some people are not fond of biscotti is because of how dry they are. However, as biscotti are a very dry biscuit, they are often accompanied by a drink of sorts. In Italy, they are often served with a fortified wine as an after dinner dessert.
Outside of Italy, they are more commonly dipped in coffee, cappuccinos, or black tea as a sweet snack.
It is important to only hold the biscotti in the hot drink for 1-2 seconds. Any more and you risk your entire biscotti falling into the drink. Of course, biscotti are also delicious and buttery all on their own.
Serve gluten-free almond biscotti alongside other Italian-inspired treats such as Chocolate Amaretti Cookies, or Gluten-Free Dairy-Free Tiramisu Jars.

Expert Tips
Here are some of my top tips and tricks for successful gluten-free biscotti:
- Keep an eye on the toasted almonds to avoid burning. They should be lightly coloured and smell fragrant when done, after about 10 minutes.
- Allow the dough to rest and hydrate before shaping.
- Let the logs cool after the first bake! But not for too long. 20-25 minutes is all the time the logs should need to cool before slicing. Any shorter or longer and they will be too crumbly.
- Take your time slicing. Saw with the serrated knife and slice if you hit a whole almond. Don't stress if you have some breakage, it's just a mid-baking snack!
- Touch the top of the biscotti slices to check if they are dry during the second bake. Be careful! The oven will be hot. Only flip once the top is dry to the touch.
- Transfer the biscotti to a wire rack as soon as you can handle them (gently!). If they are let cool on the baking sheet for too long, condensation may form on the bottom, ruining the nice crispiness you just created.
- Don't rush tempering the chocolate. Chocolate can easily overheat and burn, ruining your temper. Take your time and follow the instructions. And use a thermometer!
Frequently Asked Questions
While these biscotti are gluten and dairy-free, the 2 eggs are integral in the binding and structure of the dough. I recommend searching for a vegan biscotti recipe.
I like to use a large serrated knife to cut the biscotti into pieces from the logs. Gently saw back and forth, and slice if you hit a large almond piece. Yes, there will be some crumbles, but that's just a bonus snack! 😉
If your biscotti log is falling apart when you try to slice it like the above description, then you likely either didn't cool the log enough, or it got too cool after the first bake. It's okay, keep slicing with your serrated knife. Try a chefs knife to see if that helps, or cut wider biscotti pieces.
The biscotti logs are done after the first bake when they are dry to the touch on top. During the second bake, biscotti pieces are ready to flip when the tops of several pieces are dry, and after flipping, they are done baking when the other side is dry, and the pieces have a light golden colour.
Your biscotti may not be crunchy if they are not baked enough. Ensure you don't flip the pieces during the second baked until they are dry on top. Then do the same with the other side. They should also dry a bit more as they cool. A softer biscotti will still taste delicious, just bake for longer next time!
Finished biscotti can be frozen in an airtight container for 1-2 months. Thaw at room temperature for several hours. Note that the texture may change slightly.

These gluten-free almond biscotti are a delicious and impressive treat. They are crisp, buttery, and the perfect snack with a warm cup of coffee or tea on a cool day. With an easy dairy-free option, these allergy-friendly biscotti are sure to impress a crowd!
More Gluten-Free Italian-Inspired Recipes:
- Gluten-Free Dairy-Free Tiramisu Jars
- Chocolate Espresso Amaretti Cookies
- Gluten-Free Dairy-Free Pumpkin Tiramisu
Related Recipes


Have you made these gluten-free almond biscotti? I'd very much appreciate it if you leave a 5-star ⭐️⭐️⭐️⭐️⭐️ review below, and tag me on instagram @fromoliviaskitchen!
Recipe
Gluten-Free Almond Biscotti
Ingredients
- 1 cup (140g) whole raw almonds
- ½ cup salted butter, melted use dairy-free if preferred. If using unsalted, add an extra ¼ teaspoon salt.
- ½ cup (120g) packed brown sugar
- 2 eggs room temperature
- 2 teaspoon vanilla extract
- ¼ teaspoon almond extract optional
- 2 cups (300g) gluten-free all-purpose flour with xanthan gum I use Bob's Red Mill 1:1 Baking Flour (blue bag)
- 1 teaspoon baking powder
- ¼ teaspoon salt add an extra ¼ teaspoon if using unsalted butter
- 1 cup (150g) 60-70% dark chocolate, finely chopped use dairy-free if preferred. Avoid chocolate chips as they don't melt as well.
Instructions
Make the biscotti dough
- Preheat the oven to 350°F and prepare a rimmed baking sheet with parchment paper. Spread the almonds across the baking sheet in 1 layer. Bake for about 10 minutes, shaking halfway through. Keep an eye on them to prevent burning. They will be darker in colour and smell toasty when done. Remove and let cool for 5 minutes, then roughly chop. Don't chop too small or you won't see pieces of almond in the biscotti slices. You can leave the oven on while you prepare the dough.
- In a medium size bowl, whisk together the melted butter, brown sugar, eggs, vanilla extract, and almond extract until smooth. Add the flour, baking powder, and salt. Use a rubber spatula to lightly mix the dry ingredients together on top, then fold the dry into the wet to create a homogenous dough. Fold in the chopped almonds evenly. Allow the dough to sit and hydrate for 10 minutes.
Bake the biscotti
- Prepare a large baking sheet (or 2 smaller ones) with parchment paper. Lightly flour your hands and divide the dough in half. If you have a kitchen scale, each half should be approximately 387g. Place the dough on the parchment paper and use your hands to shape into 2 logs (see images in the blog post). My logs are approximately 10x20cm and 1.5 cm thick (3"x11" and ⅝" thick). If you want thicker biscotti, make the logs slightly taller height-wise and shorter length-wise. If you want shorter pieces, make the logs longer and more narrow. Changing the shape may affect the baking time slightly.
- Bake at 350ºF for 28-30 minutes, until dry to the touch. Remove the baking sheet(s) from the oven and allow the logs to cool for 20-25 minutes. Reduce the oven temperature to 285ºF. It is important to let the logs cool, but not too much, before cutting. They can crumble if too hot, and also if too cool.
- Gently transfer 1 log to a cutting board if preferred. Use a large, sharp, serrated knife to cut the biscotti log into 1.5cm width slices (⅝"). I like to cut parallel to the short side, down the log. For longer biscotti, you can also cut diagonally. To cut, gently saw through the log. If I reach a stubborn almond, I will sometimes slice right through. You'll get the hang of it. Don't worry, some breakage if normal. You should get approximately 24-30 biscotti total, depending on thickness and slicing direction.
- Place the biscotti slices, cut side down, back on the parchment lined baking sheet. Repeat with the other log. Bake at 285ºF for 15-20 minutes, until the top feels dry to the touch. Then flip all of the biscotti pieces so the bottom side is now on the top. Bake for another 15-20 minutes until dry to the touch. They will be crisp and slightly golden. The biscotti will also dry out more as they cool.
- Allow the biscotti to cool on the baking sheet until you are able to handle them, then transfer to a wire rack to cool completely, about 2 hours.
Temper the chocolate
- Once the biscotti are fully cooled, you can prepare the chocolate for drizzling or dipping. It is important to temper the chocolate, as this will ensure the chocolate is dry at room temperature and not sticky. If you are familiar with tempering chocolate, use the method you are most comfortable with. This easy microwave tempering method was learned from Sugar Geek Show (see link in blog post).
- Place the chopped dark chocolate in a plastic or silicone bowl and microwave for 30 seconds. Stir well with a spoon or rubber spatula. Microwave for another 30 seconds, then 15, then 10, then 10 seconds, stirring well in between each heating. The most important thing is that the chocolate does not go above 90ºF. Use a candy or probe thermometer to check the temperature of the middle of the melted chocolate. If it is ever too hot, keep stirring to incorporate air, and add a few pieces of un-melted chocolate to cool it down. If necessary, continue with 10 second intervals, stirring and checking the temperature, until smooth. Use the back of your spoon or spatula to spread some melted chocolate on a piece of parchment paper. If it starts to solidify in a few minutes, then your chocolate is good to use.
- Place the wire rack of biscotti over a piece of parchment paper to catch the drips. Use your spoon to drizzle the melted chocolate over the biscotti. I like to drizzle over half of each piece, so there is a plain side to grab the biscotti. You can also dip the biscotti in the chocolate, but I find this can end up too thick sometimes. If you have extra chocolate at the end, spread it thin on a piece of parchment paper, wait for it to solidify, then store for future use. Allow the drizzled biscotti to sit at room temperature for 30 minutes for the chocolate to solidify.
- Then you are ready to enjoy your homemade gluten-free almond biscotti! Eat as is for a dessert cookie, or dip in a cup of coffee or tea for a sweet snack. See storage instructions below.
Notes
- Dairy-Free: To make these biscotti dairy-free, use your favourite plant-based butter.
- Add other mix-ins. Use an equal quantity of hazelnuts, pecans, pistachios, or your favourite nut! Dried fruits are also great in biscotti. Dried cranberries, apricots, etc!
- Chocolate: I use dark chocolate in this recipe, but feel free to use semi-sweet, milk, or white chocolate.
- Extracts: Instead of almond extract, try using orange extract, or a light amount of peppermint extract. Start with ¼ tsp.
- Try a new shape. Instead of cutting parallel to the short side of the log, cut diagonally for longer, larger biscotti pieces.
- Storage: Biscotti can be stored in an airtight container at room temperature for 1-2 weeks.
- Freezing: Finished biscotti can be frozen in an airtight container for 1-2 months. Thaw at room temperature for several hours. Note that the texture may change slightly.
Comments
No Comments