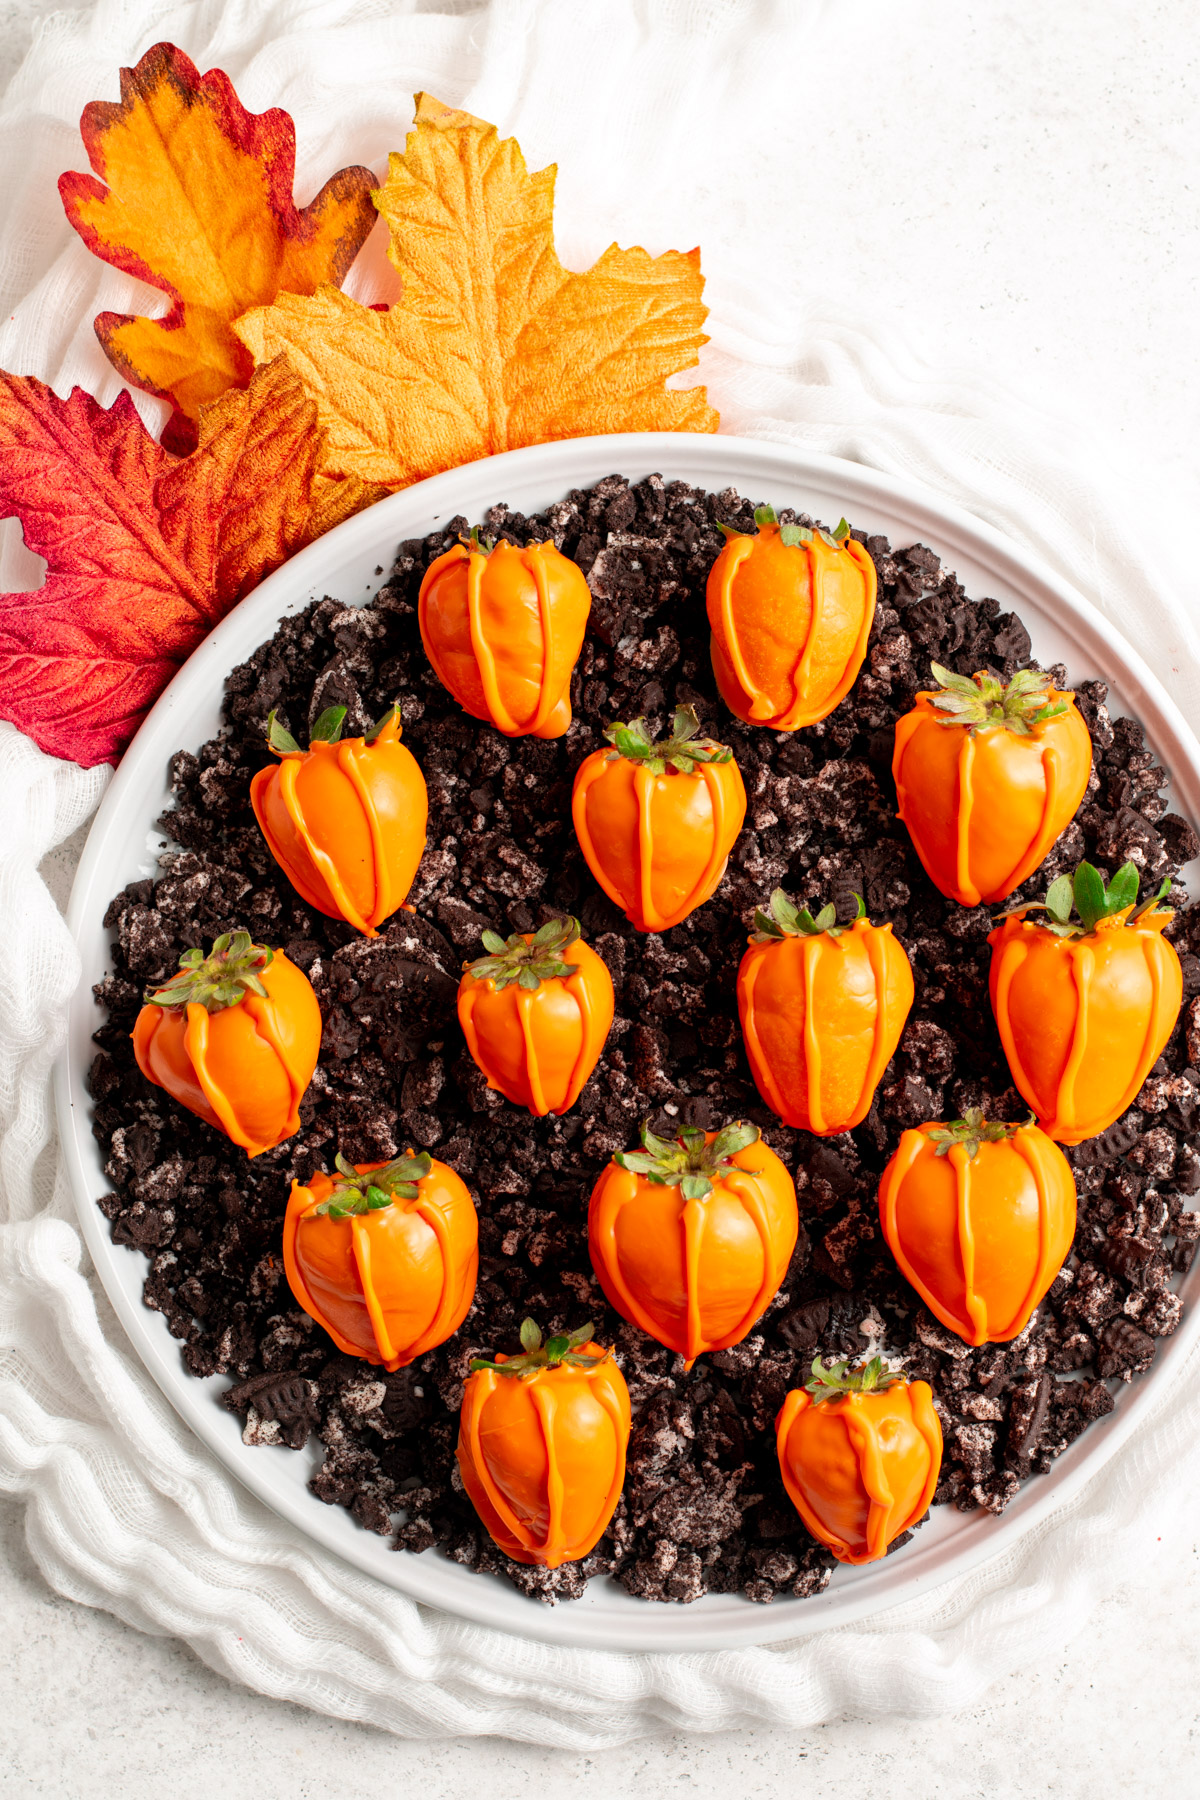
This cute little pumpkin patch dessert is made entirely from chocolate-covered strawberries. Fresh berries dipped in orange candy melts served on a bed of cookie crumbs are sure to be a Halloween party hit!
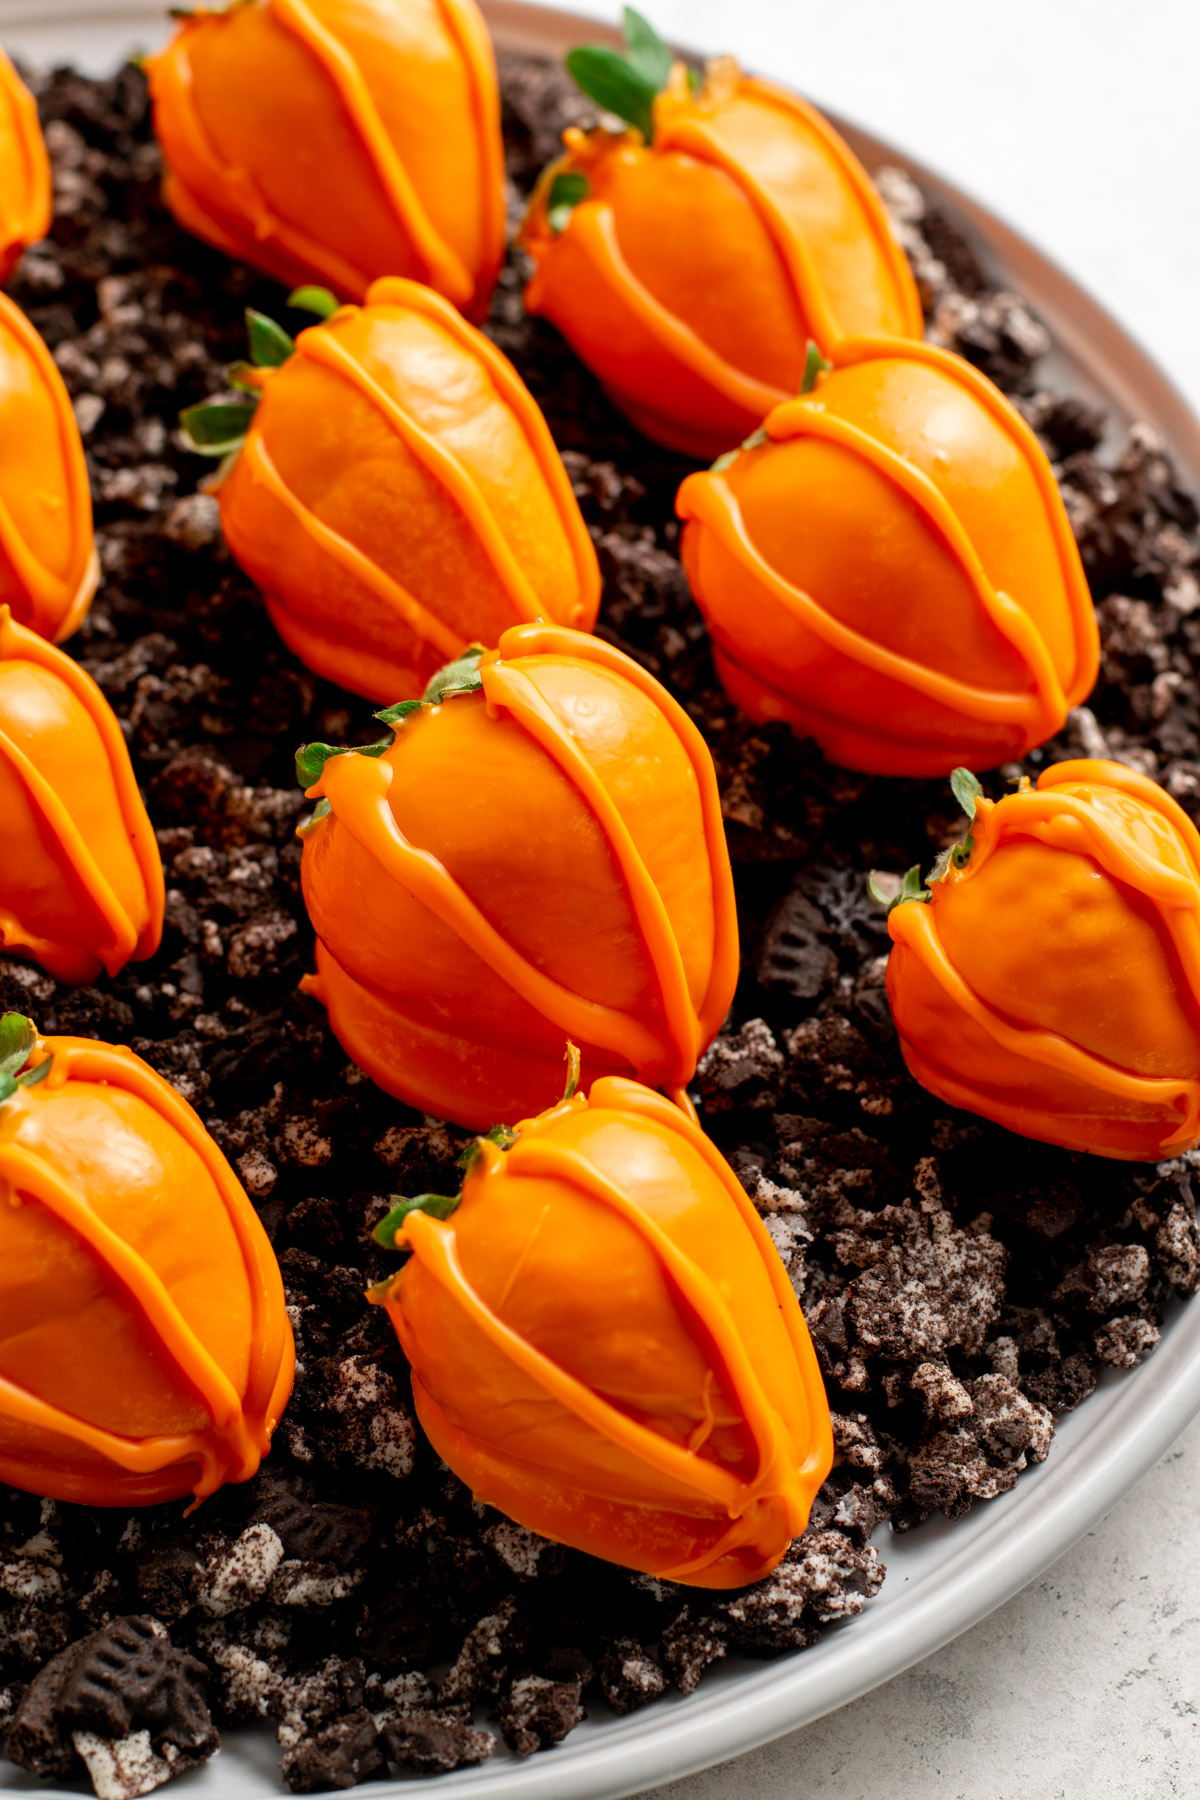
This Chocolate Covered Strawberry Pumpkin Patch is a fall dessert showstopper! Fresh strawberries are coated in orange candy melts and served on a bed of crushed (gluten-free) Oreos. How fun and delicious!
Need a treat for a Halloween party, fall birthday, or just a regular day of the week dessert? This chocolate covered strawberry pumpkin patch is sure to be something special! Plus since it can be made gluten-free, you can share it with all your friends and family.
Jump to:
Why You'll Love This Recipe
- Perfectly festive. These spooky treats are perfect for Halloween!
- Allergy-friendly for everyone to enjoy. These treats are gluten-free, nut-free, and possibly dairy-free.
- Quick & easy prep. This dessert takes just about 20 minutes to create.
- Visually impressive and delicious. Chocolate + strawberry are a classic combo. Put a fun festive twist on them and they are perfect for a Halloween party.
What is a Chocolate Covered Strawberry Pumpkin Patch?
Fresh strawberries are coated in orange candy melts (a pre-tempered version of white chocolate), decorated to look like pumpkins, and served on a bed of crushed Oreos aka dirt! It is the perfect dessert or snack for fall and Halloween.
Ingredient Notes
Here is everything you'll need to make this chocolate covered strawberry pumpkin patch:

Fresh strawberries: Fresh only! Frozen will not work here as they are too moist. Choose a pint of nice medium sized strawberries.
Orange candy melts: These are basically a pre-tempered coloured white chocolate. I get mine at Bulk Barn in Canada. Candy melts are pre-tempered meaning you can simply melt them and they will dry with a hard and crisp shell. No fuss!
Oreos: Or any other chocolate sandwich cookie. Use gluten-free Oreos or a similar brand if required. These are for serving and are optional, but cute!
Substitutions
With such few ingredients, there are not many substitutions for this recipe.
- Strawberries: You could technically coat raspberries or blueberries in orange chocolate, but the size and stem of strawberries lends itself perfectly to being pumpkin shaped.
- Orange candy melts: Candy melts are pre-tempered meaning you can simply melt them and they will dry with a hard and crisp shell. Alternatively, you could use melted white chocolate with food colouring, though tempering may be required to dry hard.
- Oreos: Use any brand of chocolate sandwich cookie. Gluten-free or not.
- Dairy-Free: Most candy melts will contain some dairy. Candy melts are best because they come in orange and they will harden to a crisp shell without need for tempering. You may attempt a vegan white chocolate with some orange food colouring, but it should be tempered.
Step-by-Step Instructions
Be sure to read the recipe card below for the full ingredient list and instructions for how to make this chocolate covered strawberry pumpkin patch.
(Prep) Thoroughly wash and dry the strawberries. Let them air dry for at least 20 minutes to ensure they are completely dry and room temperature.
Any water on the berries may cause the chocolate to seize.
(1) Place the candy melts into a heat-safe measuring cup or short glass. Microwave in 20-second intervals, stirring in between. Be careful that the candy melts don't overheat or they will seize. If this happens, let them cool down before continuing.
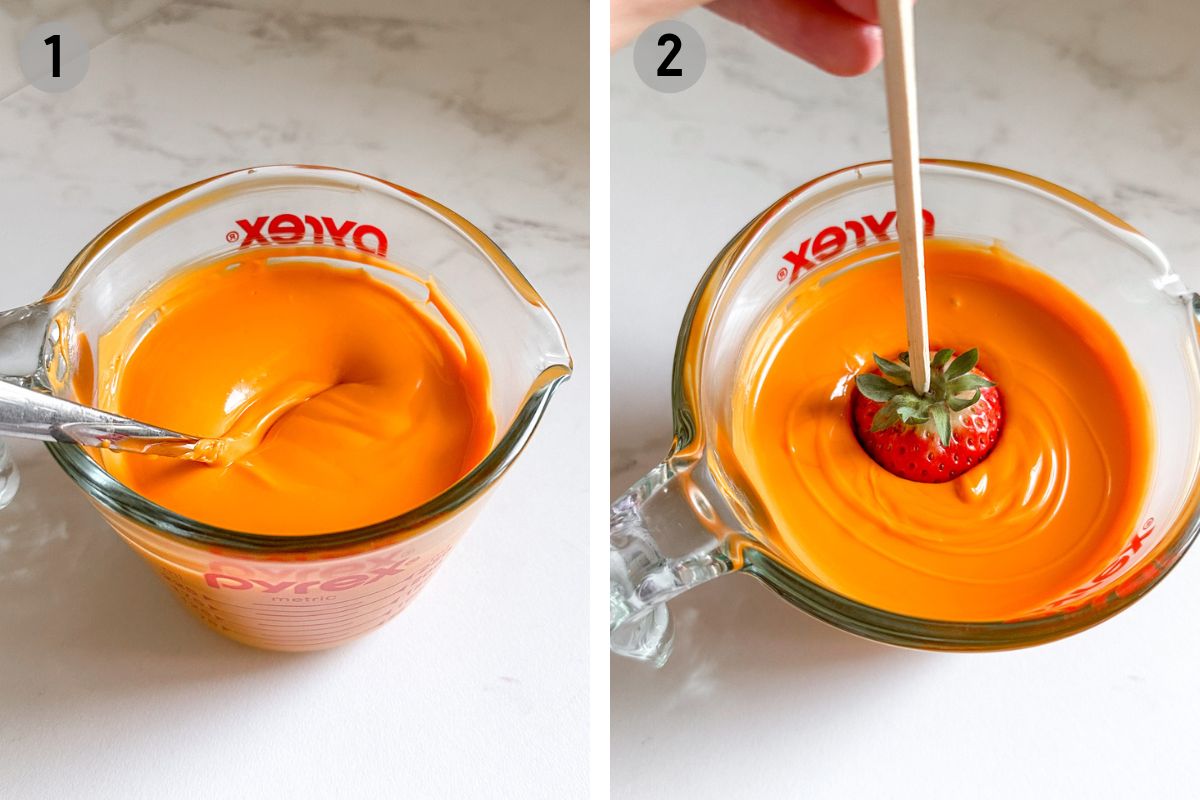
(2) Prepare a cookie sheet with parchment paper. Insert a skewer into the top of each strawberry. This makes it very easy to hold and dip cleanly.
(3) & (4) Dip the strawberries into the chocolate all the way and allow to rest on the cookie sheet. If the chocolate looks thin, another coat might be necessary. Rest for 10 minutes to solidify.

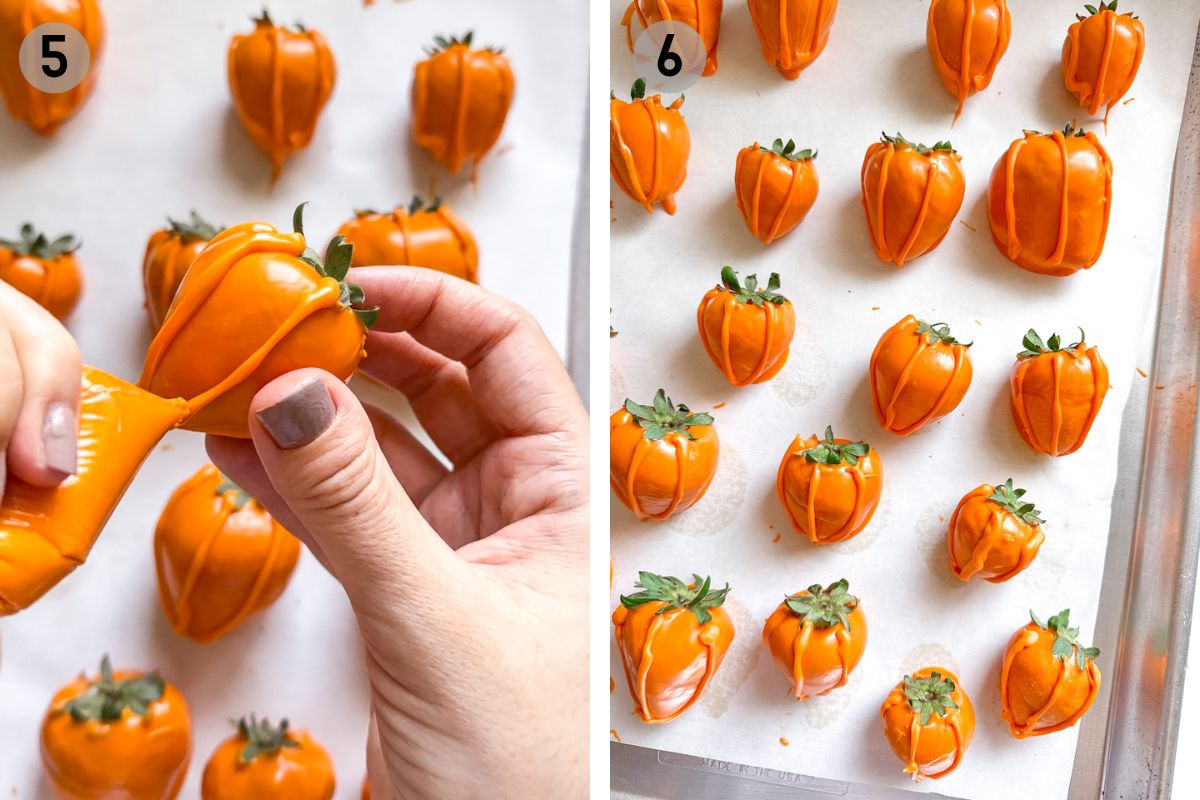
(5) Once the base is coated, place the remaining chocolate into a ziplock bag or piping bag with a very small hole. Draw 3 vertical lines across each strawberry.
(6) Rest for another 10 minutes.
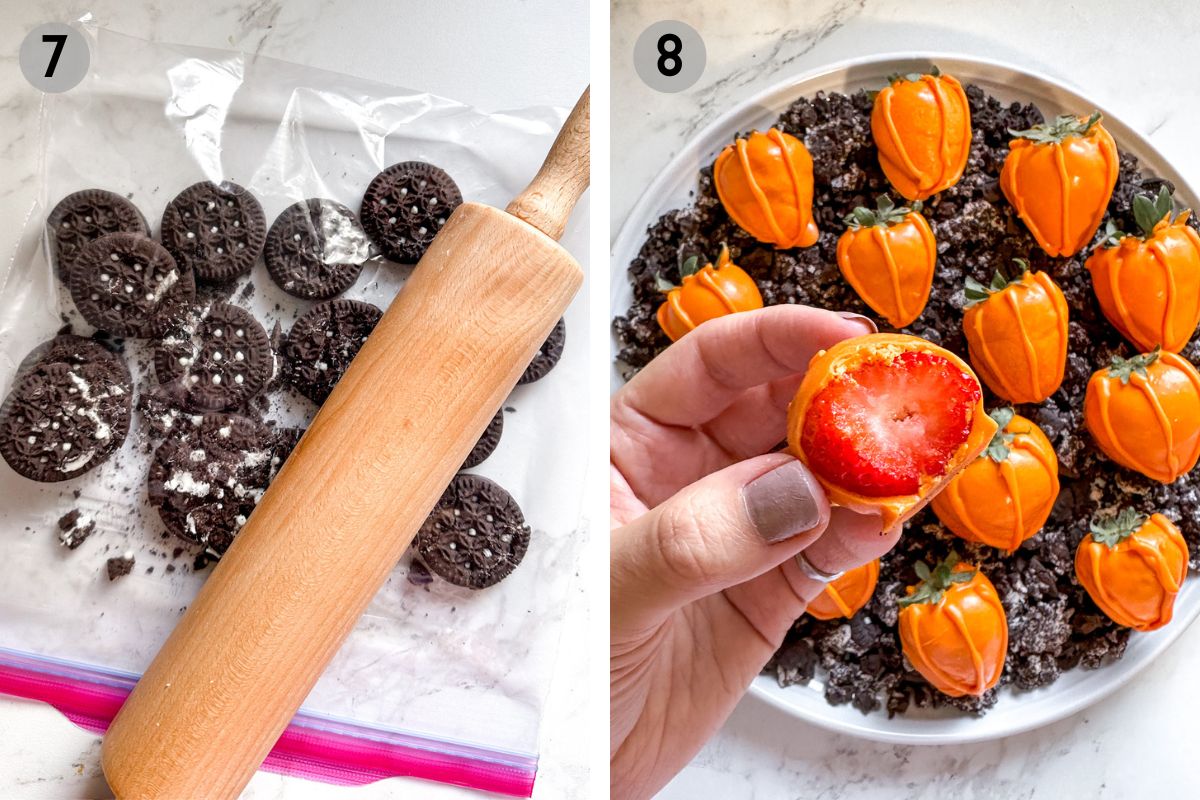
(7) Place the Oreos in a large plastic bag and crush with a heavy object like a rolling pin.
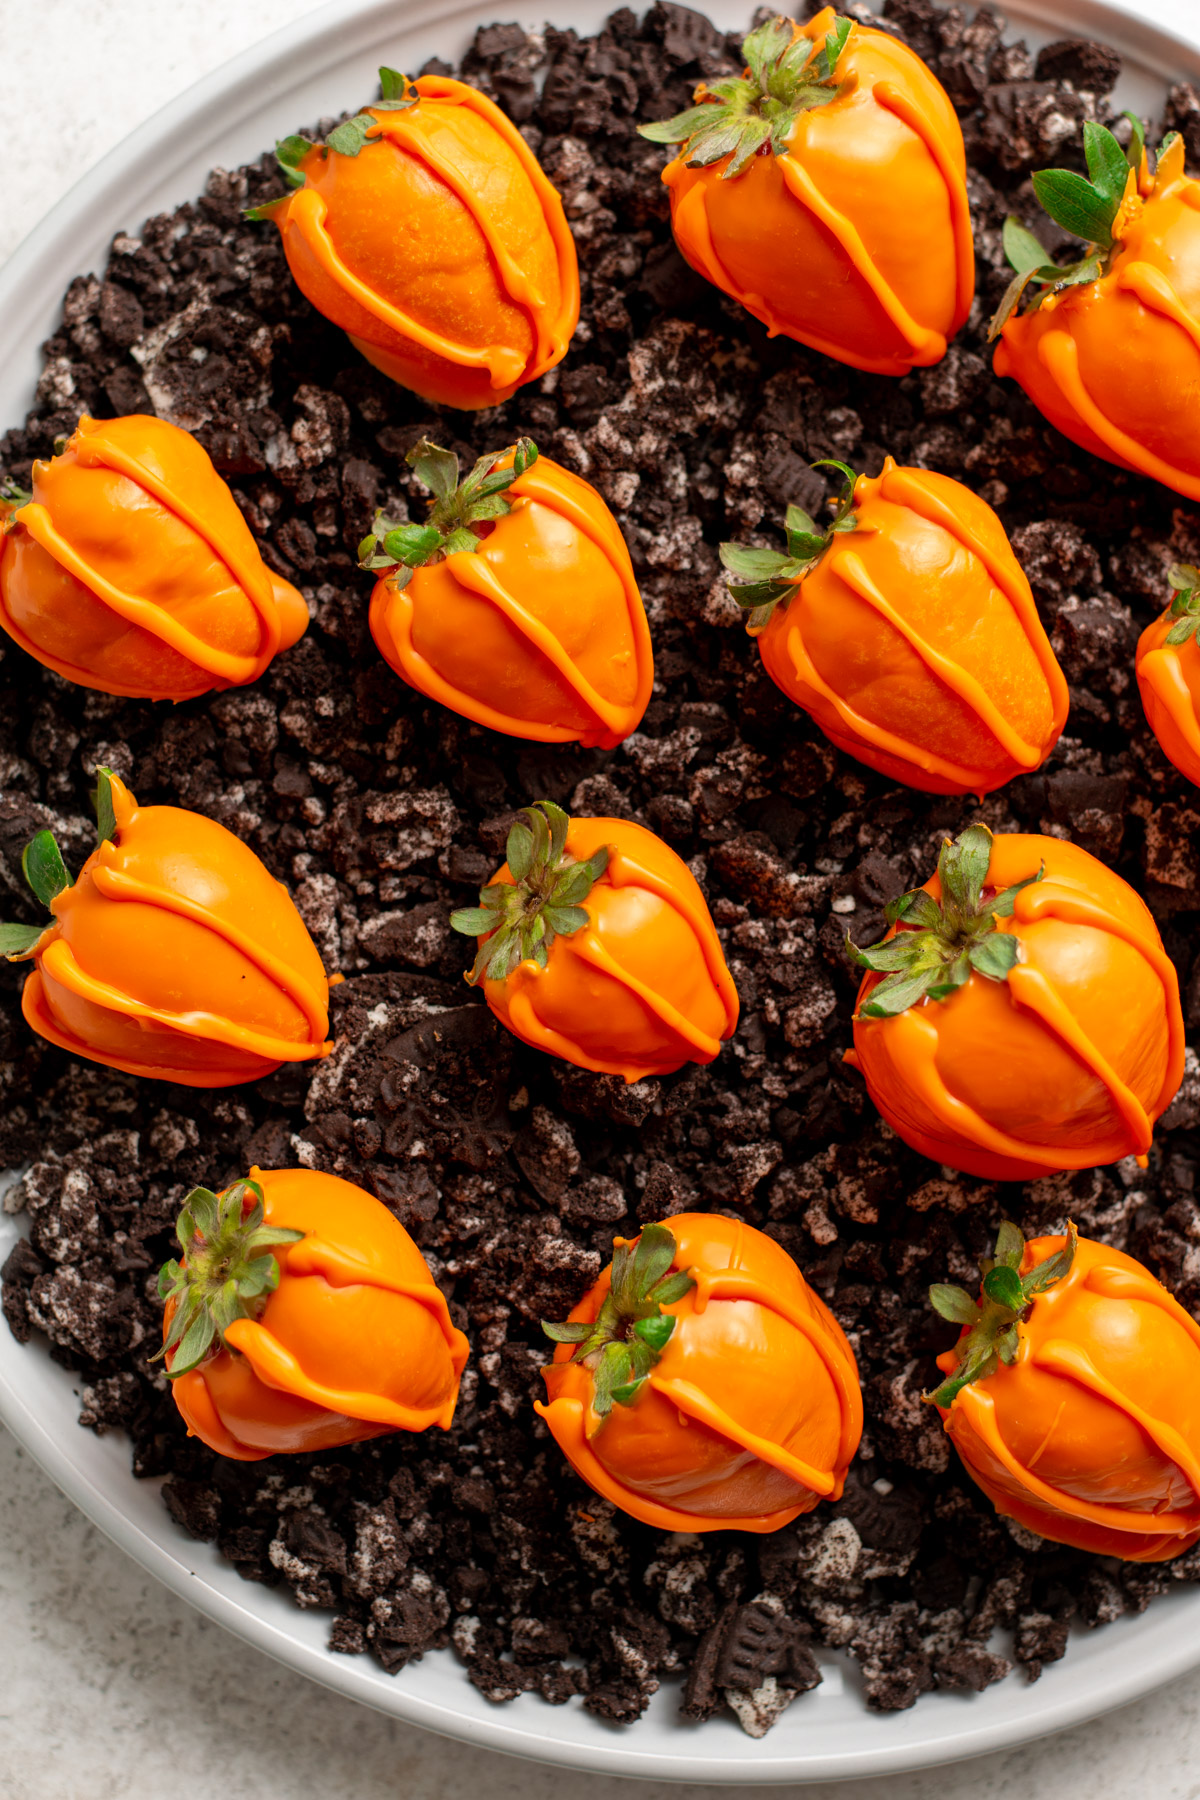
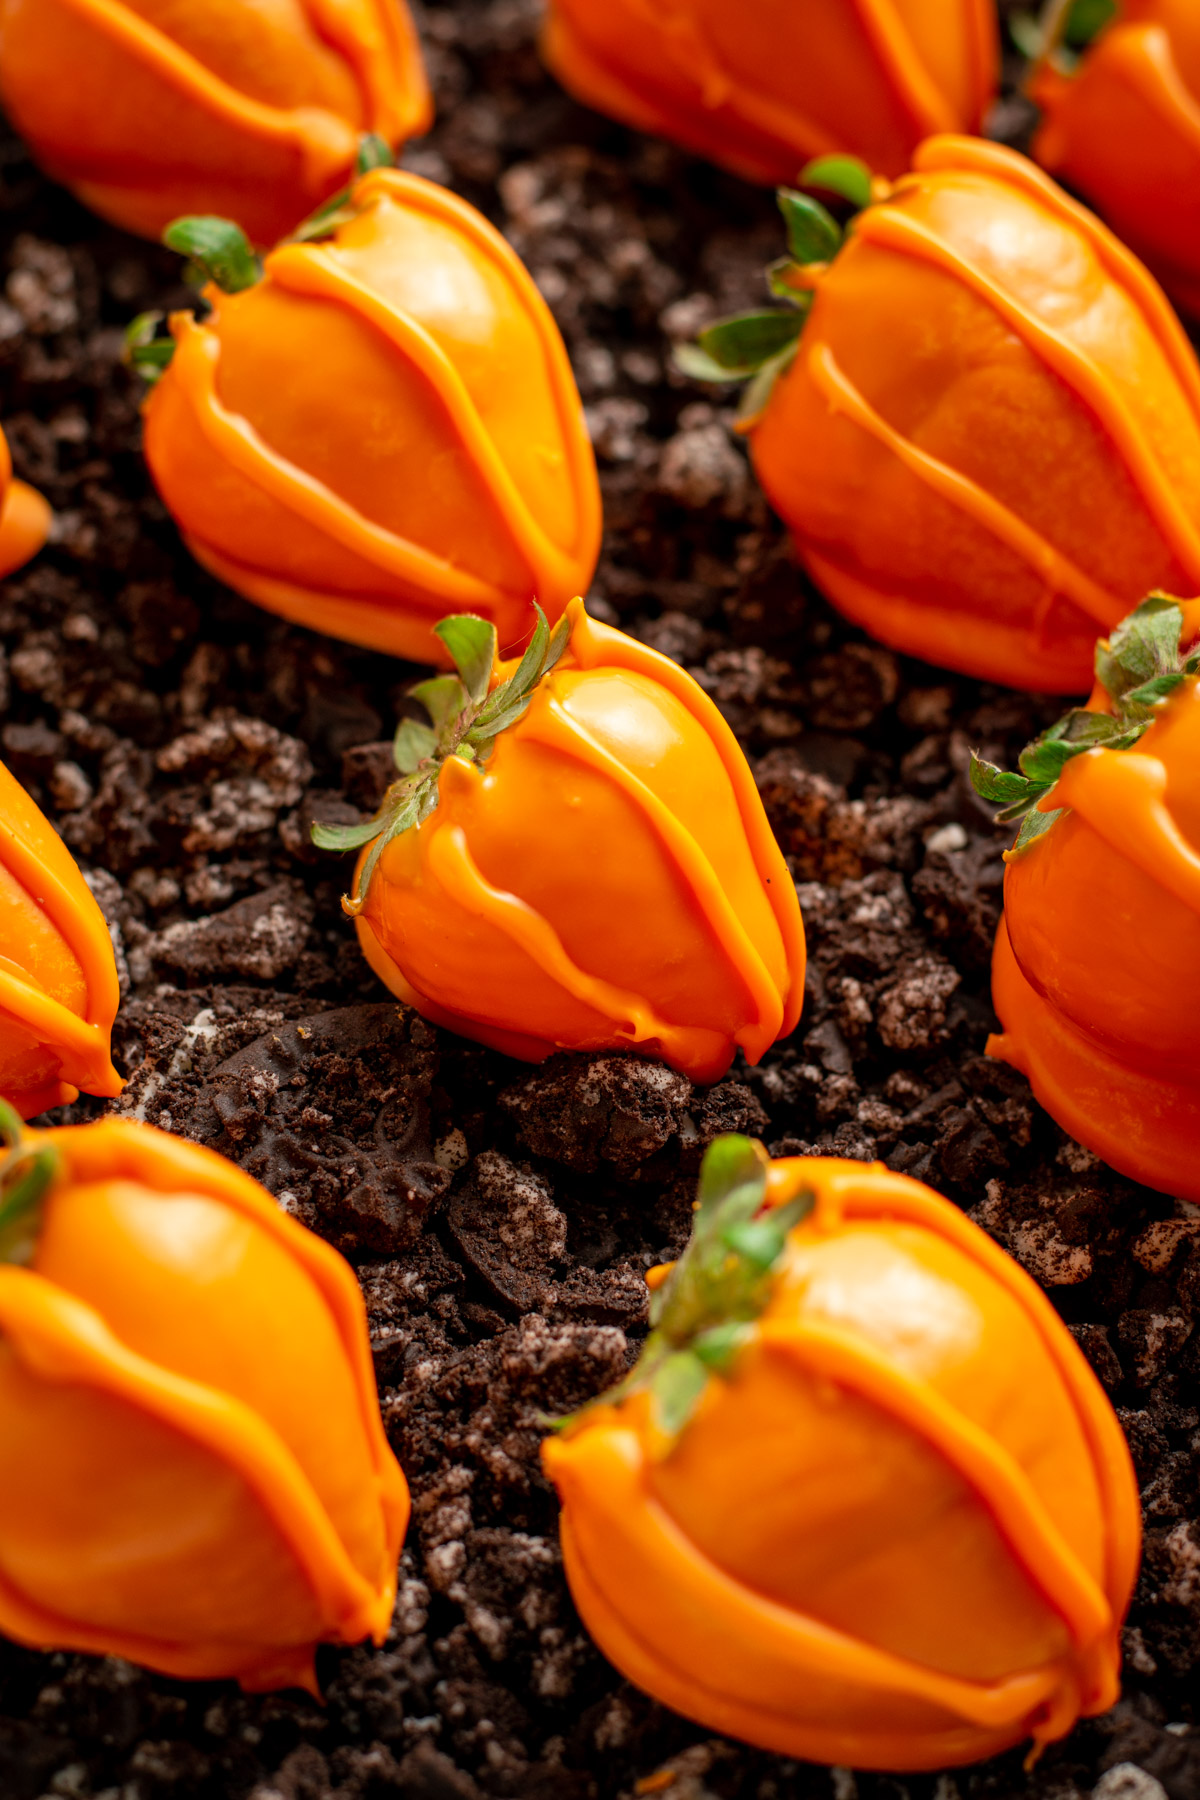
(8) Scatter on a large plate and place the strawberries on top. Best enjoyed the day prepared.
How to Serve
Be sure to serve the chocolate covered strawberries on the bed of (gluten-free) cookie crumbs for the full pumpkin patch effect!
If you're having a Halloween party, why not showcase your edible pumpkin patch beside some of these other spooky gluten-free treats:
- Vampire Bite Cupcakes (Dairy-Free)
- Pumpkin Spice Tiramisu (Dairy-Free)
- Healthy Halloween Dirt Cups (Vegan)
- Soft Pumpkin Sugar Cookies (Dairy-Free)
- Starbucks Copycat Pumpkin Scones (Dairy-Free)
- Baked Apple Fritters (Dairy-Free)
- Pumpkin Cold Brew (Dairy-Free option)
- Pumpkin Spice Latte (Vegan)
Make Ahead & Storage
Make Ahead: It is not recommended to make strawberries ahead. Prepare on the day you plan to serve.
Storage: Keep on the counter the day you make them? Should there be leftover strawberries, place in the fridge overnight and consume the next day.
Leftovers: Leftover candy melts can be melted and spread thin over parchment paper. Sprinkle cookie crumbs overtop for a DIY chocolate bark. Let harden and break into pieces.
Expert Tips
Here are some of my top tips and tricks for a successful edible pumpkin patch:
- Allow the strawberries to air dry for 20+ minutes to ensure they are completely dry and room temperature. Any moisture on the berries may cause the chocolate to seize or not stick.
- Stir the candy melts repeatedly while heating. You do not want to overheat them as they may seize. They will continue to melt as you stir between warmings.
- Use a thick skewer to dip the strawberries. This will ensure they do not fall off. After a few minutes on the baking sheet, you can remove the skewer to reuse for the next berries.
- You can use a blender or food processor to crush the cookies. Just pulse a few times until you have large chunks.
- Make strawberries on the day you plan to eat them. They do not keep long as the strawberries will start to shed moisture, softening the chocolate.
- Make a Halloween bark with leftovers! Leftover candy melts can be melted and spread thin over parchment paper. Sprinkle cookie crumbs overtop for a DIY chocolate bark. Let harden and break into pieces.
Frequently Asked Questions
No! Frozen berries will be too soft and release too much moisture. Stick to fresh for this recipe.
Most candy melts will contain some dairy. Candy melts are best because they come in orange and they will harden to a crisp shell without need for tempering. You may attempt a vegan white chocolate with some orange food colouring, but it should be tempered. You could also use dark chocolate candy melts, but they will not be orange.
The strawberries must be room temperature and completely dry before dipping. If the chocolate will not stick to your berries, there is likely some moisture on them. Pat with a paper towel and allow to air dry for 20+ minutes until they are completely dry to the touch.
On the day you make them, keep the chocolate covered berries at room temperature. Should there be leftovers, you can refrigerate overnight, but note that there will likely be condensation on them when you remove them. Still good to eat! Only keep for 1 day.
No matter if you’re serving this to kids, teens, or adults – anyone who gets a chance to taste this chocolate covered pumpkin patch is sure to love it! It's a super fun themed dessert for a Halloween party. And since it can be made gluten-free, you can serve this to all of your family & friends!
More Gluten-Free Halloween Recipes
- Healthy Halloween Dirt Cups
- Vampire Bite Cupcakes
- Gluten-Free Dairy-Free Pumpkin Tiramisu
- Baked Apple Fritters
- Soft Pumpkin Sugar Cookies
More Gluten-Free Fall Recipes


Have you made this chocolate covered strawberry pumpkin patch? I'd very much appreciate it if you leave a 5-star ⭐️⭐️⭐️⭐️⭐️ review below, and tag me on instagram @fromoliviaskitchen!
Recipe

Chocolate Covered Strawberry Pumpkin Patch
Ingredients
- 1 pint fresh strawberries medium-sized
- 2-3 cups orange candy melts
- ⅔ package crushed Oreos use gluten-free Oreos or a similar brand if required, for serving.
Instructions
- Thoroughly wash and dry the strawberries. Let them air dry for at least 20 minutes to ensure they are completely dry and room temperature.
- Place the candy melts into a heat-safe measuring cup or short glass. Microwave in 20-second intervals, stirring in between. Be careful that the candy melts don't overheat or they will seize. If this happens, let them cool down before continuing.
- Prepare a cookie sheet with parchment paper. Insert a skewer into the top of each strawberry. This makes it very easy to hold and dip cleanly.
- Dip the strawberries into the chocolate completely and allow to rest on the cookie sheet. If the chocolate looks thin, another coat might be necessary. Rest for 10 minutes to solidify.
- Once the base is coated, place the remaining chocolate into a ziplock bag or piping bag with a very small hole. Draw 3 vertical lines across each strawberry. Rest for another 10 minutes.
- Place the Oreos in a large plastic bag and crush with a heavy object like a rolling pin. Scatter on a large plate and place the strawberries on top. Best enjoyed the day prepared.
Notes
- Dairy-Free: Most candy melts will contain some dairy. Candy melts are best because they come in orange and they will harden to a crisp shell without need for tempering.
- Make Ahead: It is not recommended to make strawberries ahead. Prepare on the day you plan to serve.
- Storage: Keep on the counter the day you make them. Should there be leftover strawberries, place in the fridge overnight and consume the next day.
- Leftovers: Leftover candy melts can be melted and spread thin over parchment paper. Sprinkle cookie crumbs overtop for a DIY chocolate bark. Let harden and break into pieces.
Comments
No Comments