Combine your love of sushi with the ease of a casserole in this spicy salmon sushi bake! Layers of sushi rice, seaweed, and a creamy salmon mixture are baked together then topped with spicy mayo and your choice of toppings. This recipe makes homemade sushi an easy weeknight meal, ready in just over an hour!
Ever wanted to make sushi at home but you don't have the time, equipment, or technique? Why not try this easy Salmon Sushi Bake!
Combining all your favourite sushi flavours with the simplicity of a casserole, this delicious dish comes together in just over an hour. You can have homemade sushi for dinner without breaking out the bamboo roller!
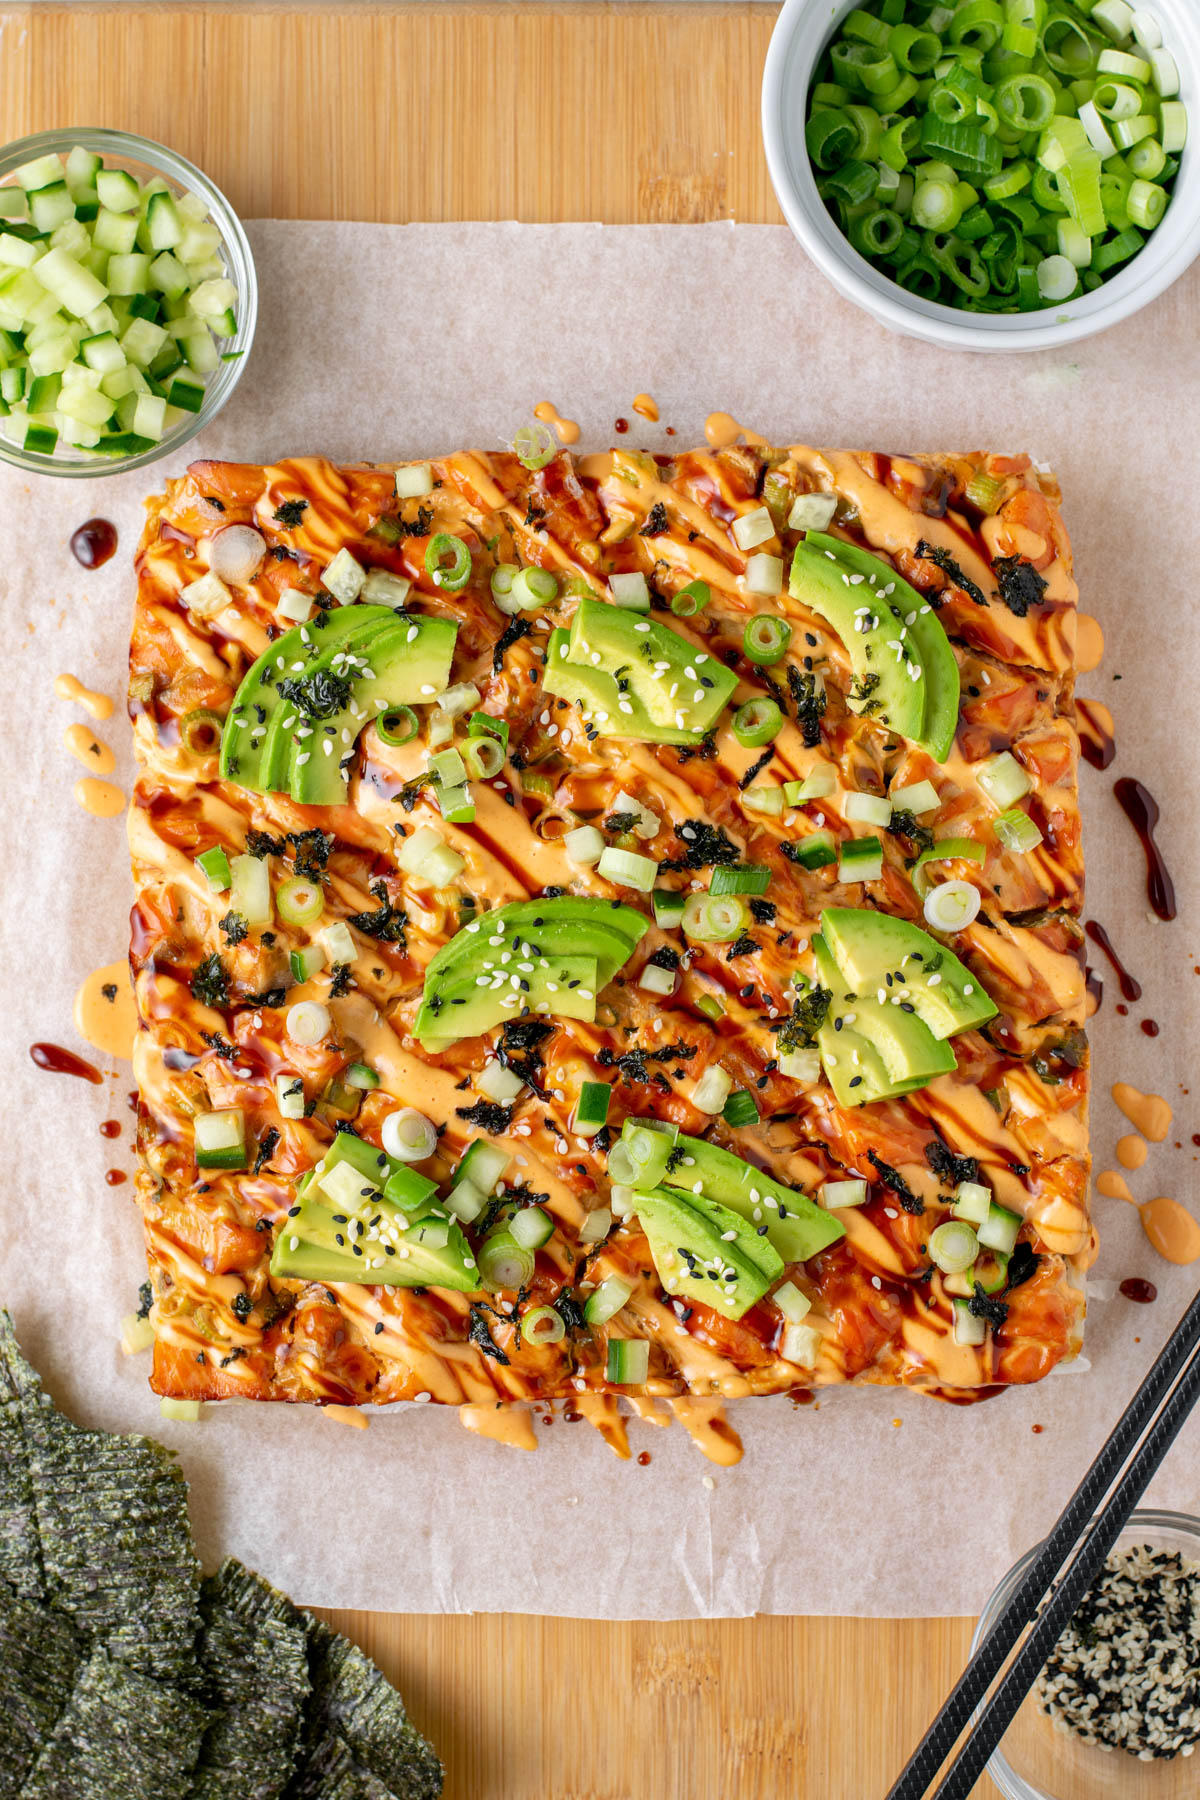
Layers of sushi rice, seaweed, and a creamy salmon mixture are baked together and topped with spicy mayo, avocado, green onions, diced cucumber, sesame seeds, and a homemade gluten-free eel sauce.
This recipe is inspired by the flavours and textures of a spicy salmon sushi roll. I do not claim this dish to be authentic, but rather an approachable recipe to enjoy sushi at home!
Jump to:
Why You'll Love This Recipe
- All the sushi flavours, less of the mess. No stuffing, no rolling, no slicing!
- Ready in just over an hour. Making this recipe perfect for dinner.
- Easily allergy-friendly. This recipe is gluten-free and nut-free, and can easily be made dairy-free.
What is a Sushi Bake?
This sushi bake recipe is inspired by the flavours and textures of a spicy salmon roll.
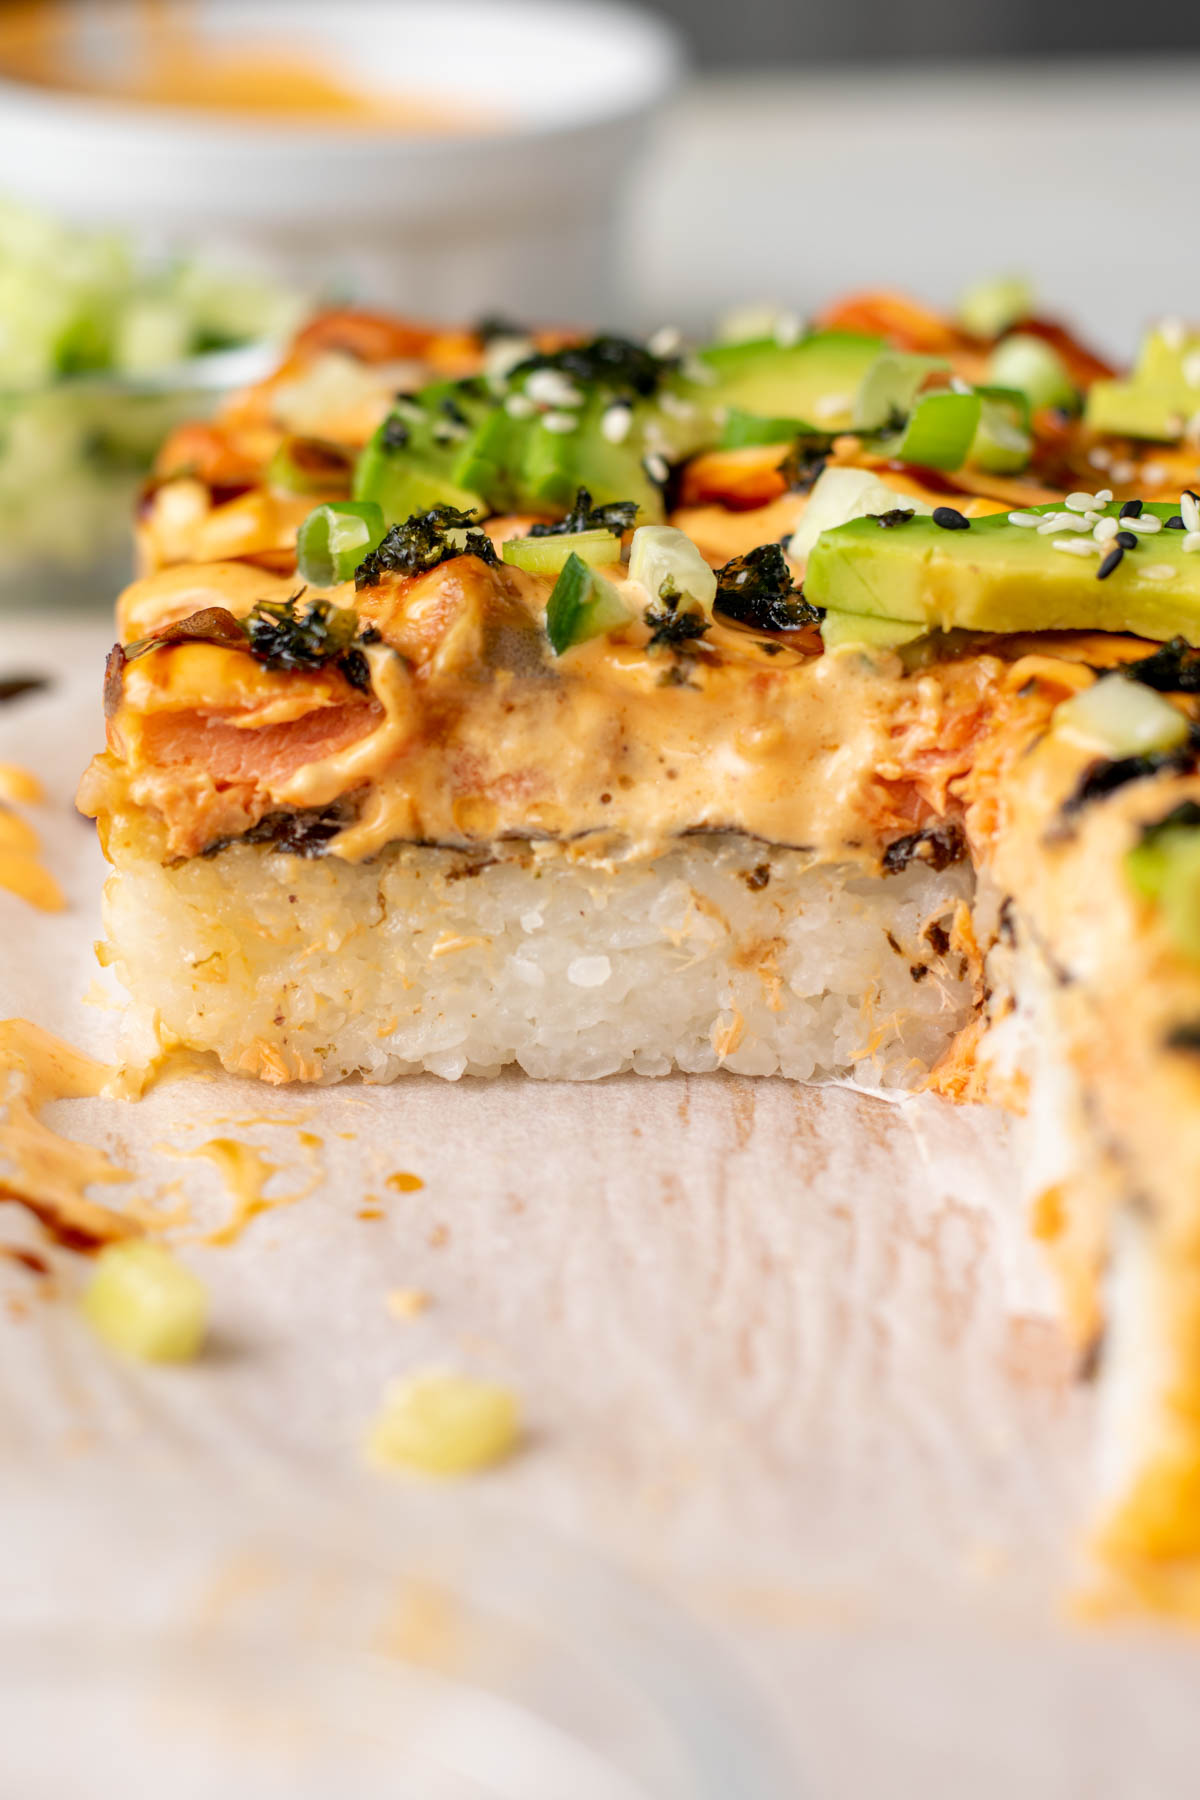
Sushi rice is cooked then pressed into a baking dish, covered with a layer of nori seaweed, then topped with a creamy salmon mixture. The entire dish is then baked, topped, and cut for serving. Saving you the hassle and mess of creating traditional sushi rolls.
I do not claim this recipe or technique to be authentic, but rather a simplified and approachable method to enjoy sushi-inspired flavours at home.
Ingredients
Here is everything you'll need to make this salmon sushi bake, along with notes on key ingredients you may not have in your pantry already.

Sushi rice: Also known as "sticky rice", sushi rice is a short grain rice that is, well, characteristically sticky. Ensure your package says either sushi rice or sticky rice for the best effect. I enjoy this Lundberg sushi rice.
Seasoned rice vinegar: This is what gives sushi rice its classic taste and texture. If you don't have seasoned rice vinegar, you can alternatively use plain rice vinegar with 2 tablespoon sugar and 1 teaspoon salt. Before using, microwave the mixture in 15 second intervals until dissolved.
Mayonnaise: Use a Japanese mayo like Kewpie if you have access. If not, any mayo will do.
Gluten-free tamari or soy sauce: I enjoy the flavour of San-J low sodium tamari. You could also use coconut aminos. If you're not gluten-free, use whatever soy sauce you have.
Sriracha or Sambal Oelek: If you don't have these, use whatever chili sauce or hot sauce you have on hand.
Mirin or any white wine: This is a small component of the homemade eel sauce. Mirin is a sweet rice wine that you may use often if you do a lot of Asian cooking. If you don't have it though, a little bit of any white wine will work for the sauce.
Nori seaweed sheets: These seaweed sheets are used as the middle layer of the sushi bake. If you can't find any, you could also use furikake as the middle layer or topping. Furikake is a seasoning made from crushed seaweed, salt, sugar, and sesame seeds.
Substitutions
A lot of this recipe is about using what you have on hand. Here are some substitution suggestions:
- Dairy-free. Use your favourite dairy-free cream cheese, or omit and use slightly more mayo.
- Low spice. Omit the spicy mayo if you don't want the heat.
- Seasoned rice vinegar. Alternatively, you can use ¼ cup plain rice vinegar with 2 tablespoon sugar and 1 teaspoon salt. Before using, microwave the mixture in 15 second intervals until dissolved.
- Seaweed sheets. If you can't find any, you could also use furikake as the middle layer or topping. Furikake is a seasoning made from crushed seaweed, salt, sugar, and sesame seeds.
- Not gluten-free? Use your favourite soy sauce.
- Toppings. Many of the toppings suggestions such as sesame seeds, diced cucumber, avocado, and furikake can be omitted or swapped if you don't have them.
Step-by-Step Instructions
Be sure to read the recipe card below for the full ingredient list and instructions for how to make this salmon sushi bake.
Make the Sushi Rice
Make Ahead: Prepare the sushi rice the night before or earlier in the day for quick and easy assembly.
(1) Rinse the rice thoroughly until the water runs clear. Add the rice to a medium size saucepan with the water. Allow the rice to soak for 20 minutes.
Bring the pot to a boil then lower to a simmer and cover. Cook according to the package instructions, generally about 12-20 minutes.
Remove from the heat and allow the rice to steam for 10 minutes before fluffing with a fork. Stir in the seasoned rice vinegar.
Cooking Tip: If you don't have seasoned rice vinegar, you can alternatively use plain rice vinegar with 2 tablespoon sugar and 1 teaspoon salt. Before using, microwave the mixture in 15 second intervals until dissolved.

Make the Salmon Mixture
While preparing the rice, make the salmon mixture.
(2) Remove the skin from the salmon and dice into about ½" cubes.
(3) In a large bowl, stir together the cream cheese, mayo, tamari, sriracha, and green onions. Add in the salmon and gently stir to coat. Cover and refrigerate until needed.

Make the Eel Sauce
(4) While preparing the rice, make the eel sauce. In a small saucepan, combine the tamari, seasoned rice vinegar, and mirin over medium-high heat. Stir or swirl the pan often over 5 minutes. It will bubble and begin to foam.
In a separate small bowl, stir the cornstarch with 2-3 teaspoon of water until dissolved. Pour the cornstarch mixture into the saucepan and stir. It will become quite thick and sticky.
Remove from the heat, pour into a small bowl, and allow to cool.
Make the Spicy Mayo
(5) While preparing the rice, make the spicy mayo. In a small bowl, stir together all of the ingredients. Adjust the sriracha amount to your spice liking. Set aside until needed.

Prepare the Sushi Bake
Once the rice is cooked and slightly cooled, you can assemble and bake. Preheat the oven to 425ºF. Grease or line an 8x8" or 9x9" square baking dish with parchment paper.
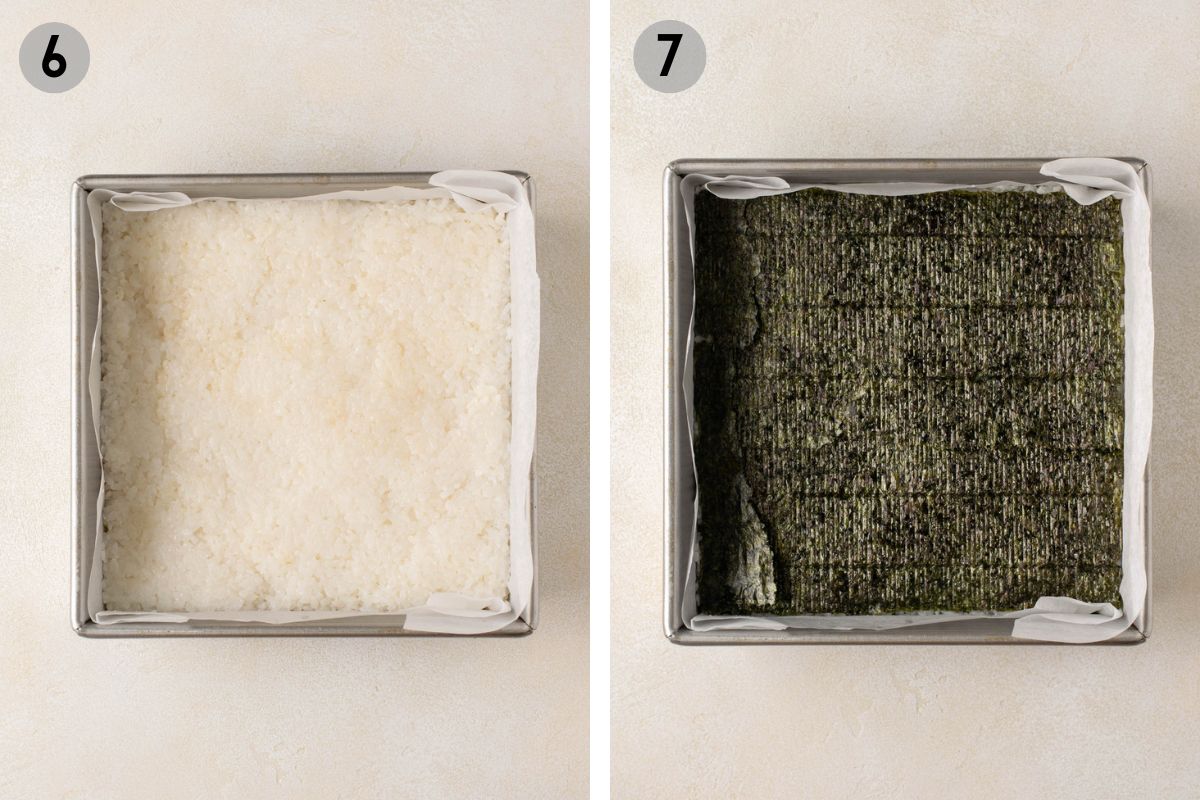
(6) Wet your hands and press the rice firmly into the baking dish. Keep wetting your hands to avoid the rice sticking.
(7) Once flat, use nori seaweed sheets to cover the top of the rice.
(8) Then spread the creamy salmon mixture over top, using a rubber spatula to spread it smooth.
(9) Bake for 20 minutes.

(10) Allow the sushi bake to cool for 10 minutes at room temperature. You can then top and enjoy warm, or place it in the fridge to cool more.
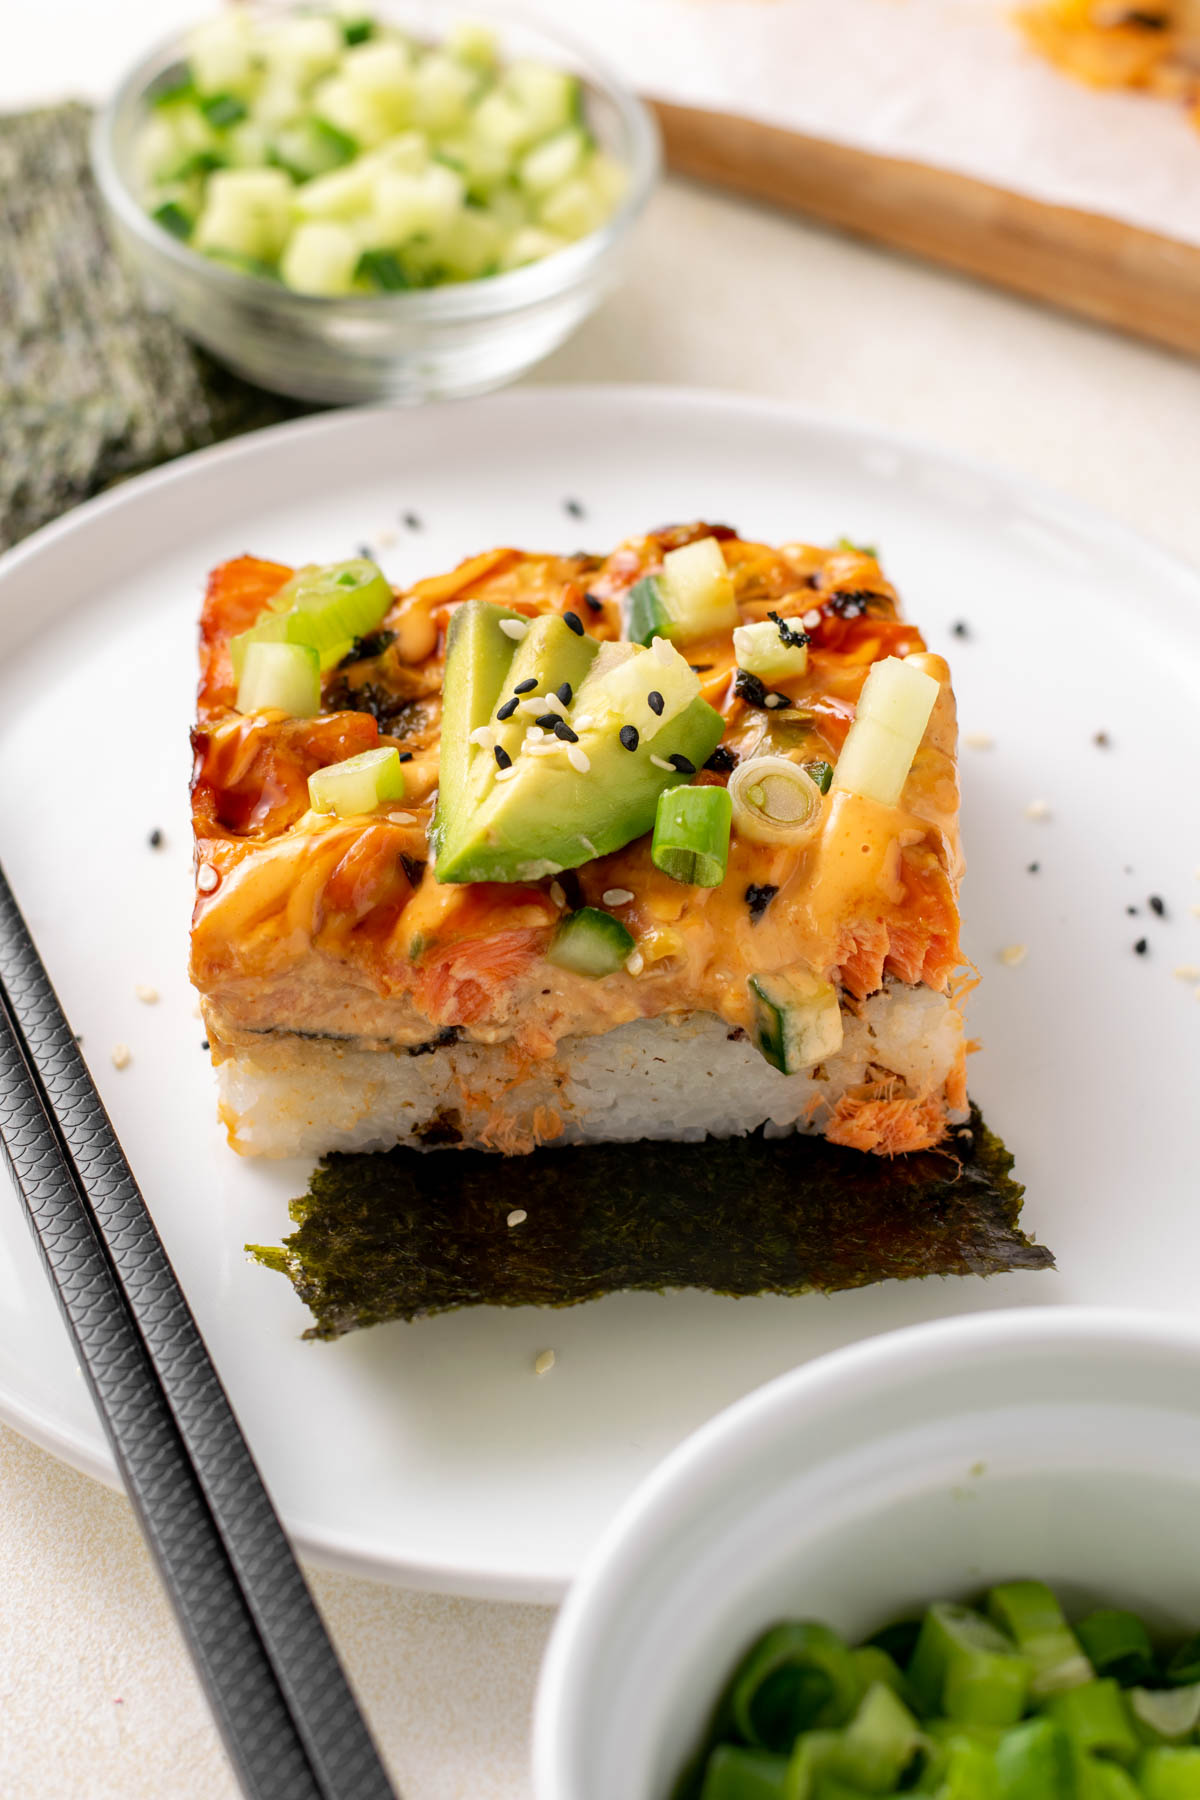
(11) Top the sushi bake by drizzling with spicy mayo and eel sauce. Add sliced avocado and sprinkle with sesame seeds, chopped green onions, diced cucumber, and/or furikake.
Carefully slice into 6 servings and enjoy!

How to Serve
This homemade salmon sushi bake can have so many different applications!
My favourite way to enjoy is to make this recipe as a main for dinner. With protein, carbs, and healthy fats, hit all your nutrients with this delicious one pan meal.
If you're looking for side options—miso soup, seaweed salad, or edamame beans would go great!
This sushi bake would also be a smashing hit when hosting. Slice into 16 mini squares to serve as an appetizer, snack, or side dish.
Make Ahead & Storage
Make Ahead: Prepare the sushi rice the night before or earlier in the day for quick and easy assembly. If you prefer to eat this dish cold like me, you could even bake the whole thing ahead of time so it is ready to enjoy from the fridge. I find it even better the next day.
Storage: Leftover slices will keep in the fridge for 2 days. I find it gets even better!

Expert Tips
Here are some of my top tips and tricks for a successful sushi bake:
- Prep ahead to save time. If you have time earlier in the day or the night before, cook the sushi rice and mix in the rice vinegar. Store in the fridge until ready to prepare the sushi bake.
- Add the salmon last into the creamy mixture to avoid breaking the pieces. Mix gently to incorporate.
- Allow the sushi bake to cool before topping. Most sushi rolls I eat are served cold, so I actually prefer this sushi bake cold as well. After baking, I like to chill it in the fridge for as long as I can before drizzling, topping, and serving. I actually find it best the next day after a night in the fridge!
- For ease, cut and serve the sushi bake right out of the pan!
Frequently Asked Questions
Rice itself is inherently gluten-free. But typically some sort of rice vinegar mixture is added to sushi rice, which may not be gluten-free at a sushi restaurant. When making this sushi bake at home, you are able to control the ingredients and use a seasoned rice vinegar without gluten.
Typically no, as one of the main ingredients is soy sauce, which often contains wheat. In this homemade version, we use either gluten-free soy sauce, tamari, or coconut aminos.
Yes! Prepare the sushi rice the night before or earlier in the day for quick and easy assembly. If you prefer to eat this dish cold like me, you could even bake the whole thing ahead of time so it is ready to enjoy from the fridge. I find it even better the next day.
Either! Enjoy hot out of the oven, or place the entire bake in the fridge for as long as you can before enjoying. I find it even better after a night in the fridge!
Enjoy miso soup, seaweed salad, edamame beans, or your favourite sushi sides with this bake. Ensure they are gluten-free if required.
This homemade spicy salmon sushi bake combines the delicious flavours of a sushi restaurant with the ease and accessibility of a casserole. Enjoyed hot or cold, this dish can be made ahead in stages for an easy weeknight sushi dinner, or an impressive hosting appetizer. Enjoy!
More Gluten-Free Mains:
- Greek Chicken Meatballs
- Gluten-Free Detroit Style Pizza
- Creamy Dairy-Free Tuscan Chicken and Orzo
- Healthy Burger Bowls
Related Recipes


Have you made this salmon sushi bake? I'd very much appreciate it if you leave a 5-star ⭐️⭐️⭐️⭐️⭐️ review below, and tag me on instagram @fromoliviaskitchen!
Recipe

Salmon Sushi Bake
Equipment
- 8"x8" or 9"x9" baking pan
Ingredients
For the Sushi Rice
- 1½ cups sushi rice
- 2 cups water or use the amount according to package instructions
- ¼ cup seasoned rice vinegar alternatively use plain rice vinegar with 2 tablespoon sugar and 1 teaspoon salt. See note below.
For the Salmon Mixture
- 1 lb salmon skin removed and diced
- ¼ cup softened cream cheese
- ¼ cup mayonnaise use a Japanese mayo like Kewpie if you have access
- 2 tablespoon gluten-free tamari or soy sauce
- 2 tablespoon sriracha or sambal oelek
- 2 sliced green onions
For the Homemade Eel Sauce (optional)
- 2 tablespoon gluten-free tamari or soy sauce
- 2 tablespoon seasoned rice vinegar
- 2 tablespoon mirin or any white wine
- ½ teaspoon cornstarch
For the Spicy Mayo Topping
- ⅓ cup mayonnaise use a Japanese mayo like Kewpie if you have access
- 2 tablespoon sriracha or sambal oelek
- 1 teaspoon lemon juice
Toppings
- 2 large nori seaweed sheets and/or furikake seasoning
- Sesame seeds
- Sliced avocado
- Sliced green onions
- Diced cucumber
Instructions
Make the Sushi Rice
- Rinse the rice thoroughly until the water runs clear. Add the rice to a medium size saucepan with the water. Allow the rice to soak for 20 minutes.
- Bring the pot to a boil then lower to a simmer and cover. Cook according to the package instructions, generally about 12-20 minutes. Remove from the heat and allow the rice to steam for 10 minutes before fluffing with a fork. Stir in the seasoned rice vinegar.
Make the Salmon Mixture
- While preparing the rice, make the salmon mixture. Remove the skin from the salmon and dice into about ½" cubes. In a large bowl, stir together the cream cheese, mayo, tamari, sriracha, and green onions. Add in the salmon and gently stir to coat. Cover and refrigerate until needed.
Make the Eel Sauce
- While preparing the rice, make the eel sauce. In a small saucepan, combine the tamari, seasoned rice vinegar, and mirin over medium-high heat. Stir or swirl the pan often over 5 minutes. It will bubble and begin to foam. In a separate small bowl, stir the cornstarch with 2-3 teaspoon of water until dissolved. Pour the cornstarch mixture into the saucepan and stir. It will become quite thick and sticky. Remove from the heat, pour into a small bowl, and allow to cool.
Make the Spicy Mayo
- While preparing the rice, make the spicy mayo. In a small bowl, stir together all of the ingredients. Adjust the sriracha amount to your spice liking. Set aside until needed.
Prepare the Sushi Bake
- Once the rice is cooked and slightly cooled, you can assemble and bake. Preheat the oven to 425ºF. Grease or line an 8x8" or 9x9" square baking dish with parchment paper. Wet your hands and press the rice firmly into the baking dish. Keep wetting your hands to avoid the rice sticking.
- Once flat, use nori seaweed sheets to cover the top of the rice. Then spread the creamy salmon mixture over top, using a rubber spatula to spread it smooth. Bake for 20 minutes.
- Allow the sushi bake to cool for 10 minutes at room temperature. You can then top and enjoy warm, or place it in the fridge to cool more.
- Top the sushi bake by drizzling with spicy mayo and eel sauce. Add sliced avocado and sprinkle with sesame seeds, chopped green onions, diced cucumber, and/or furikake. Carefully slice into 6 servings and enjoy!
Notes
- How to make your own seasoned rice vinegar: Add ¼ cup plain rice vinegar, 2 tablespoon granulated sugar, and 1 teaspoon salt to a microwave-safe bowl. Microwave in 15 second intervals, stirring until everything is dissolved. Allow to cool then use as instructed.
- Dairy-free? Use a vegan cream cheese alternative, or omit and use slightly more mayo.
- Make Ahead: Prepare the sushi rice the night before or earlier in the day for quick and easy assembly. If you prefer to eat this dish cold like me, you could even bake the whole thing ahead of time so it is ready to enjoy from the fridge. I find it even better the next day.
- Storage: Leftover slices will keep in the fridge for 2 days. I find it gets even better!
Christina says
This turned out delicious! It was very filling and super tasty. The recipe was precise and easy to make once you have all of the ingredients assembled. My husband immediately asked to add it to the weeknight rotation!
Olivia Parsons says
I'm so glad you enjoyed, Christina! This is one of my favourites too!
Emily D. says
Sushi bakes are unexpectedly really good!
This recipe was really easy to follow and had a lot of elements that could be subbed/altered. Delicious 🙂
Olivia Parsons says
I'm so glad you enjoyed, Emily! This recipe is one of my favourites too!
Melissa says
This recipe is absolutely amazing!! It tastes even better the next day too!
Kristine says
I followed this recipe exactly and it turned out pretty amazing. I had all the toppings too. The rice was a little bit crispy at the edges but soft on the inside. Salmon and the seasoning was very good. I think if I remake this i would not make the extra spicy mayo or just make half. To make it a little lighter. But that’s just my preference. My husband loves everything sushi and he enjoyed this. Lots of prep work finding all the ingredients such as the Kewpie and Furikake. Next time I will probably make the rice ahead of time. So good!
Olivia Parsons says
So glad you enjoyed Kristine! Yes, it is a lot of elements together but it is so worth it!
Joni says
My whole family loved it and that doesn't happen often. thank you!!
Olivia Parsons says
Wow! So glad to hear the family enjoyed this sushi bake!
Susan says
Family LOVED it! Definitely adding to our meal rotation!
Olivia Parsons says
So glad you enjoyed, Susan!
Ashley P says
Excellent! Hubby has asked for this on the regular now. It’s become a family favorite. Thank you!
Olivia Parsons says
I'm so glad you all enjoy!!
Kimberly says
Can this recipe be served without cooking it in the oven so that the salmon is raw?
If so, can the salmon be substituted with sushi grade raw yellow tail tuna using all the other ingredients?
Looks so yummy!
Olivia Parsons says
Yes, nothing else must be cooked except the salmon. I'm sure raw tuna would be delicious!
Jackie Gasson says
My husband was weary of this one, but to his surprise, we absolutely loved this dish and will be putting it into our regular rotation. Thank you for a great recipe!