This gluten-free Detroit style pan pizza has a fluffy focaccia-like crust with a crispy square edge. Loaded with cheese, marinara sauce, pepperoni, and hot honey, you will be blown away that this pizza is gluten-free!
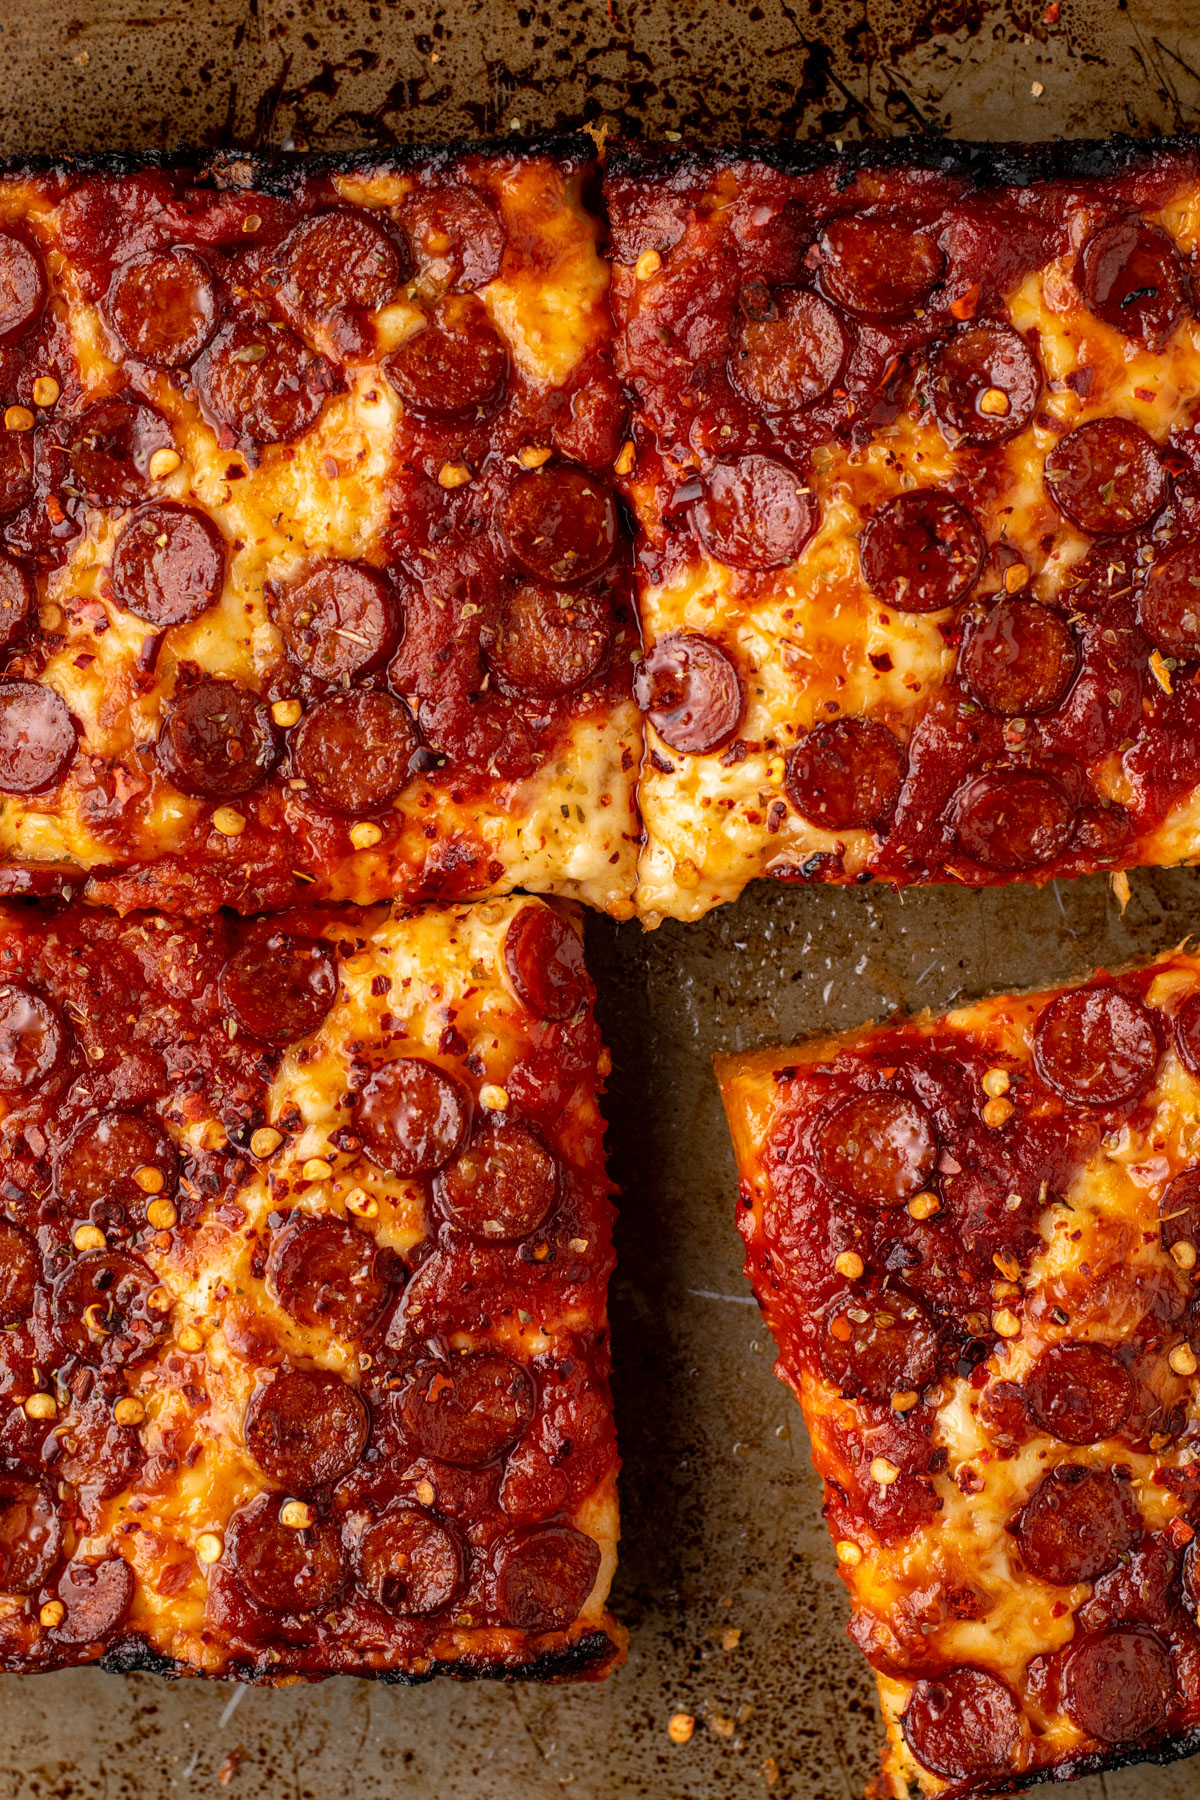
This Gluten-Free Detroit Style Pizza is the ultimate comfort meal. It's crispy, it's cheesy, it's loaded with flavour, and it's gluten-free! You will be SHOCKED at just how fluffy the crust is. I bet you've never had a gluten-free pizza like this!
Classic Detroit style pizza is known for its rectangular shape and fluffy focaccia-like crust with a crispy edge of cheese. Topped with cheese first then stripes of tomato sauce, pepperoni, and whatever else you dream of, this thing is loaded!
I'd never had a pizza like this, let alone gluten-free, until I visited Stay Gold Pizza in Ottawa and they had a GF crust. It was the most incredible pizza I'd ever had. And since we all can't frequent Ottawa, I thought I'd give my take on the incredible Detroit style pan pizza. Keep reading to learn how to make it!
Jump to:
What is Detroit Style Pizza?
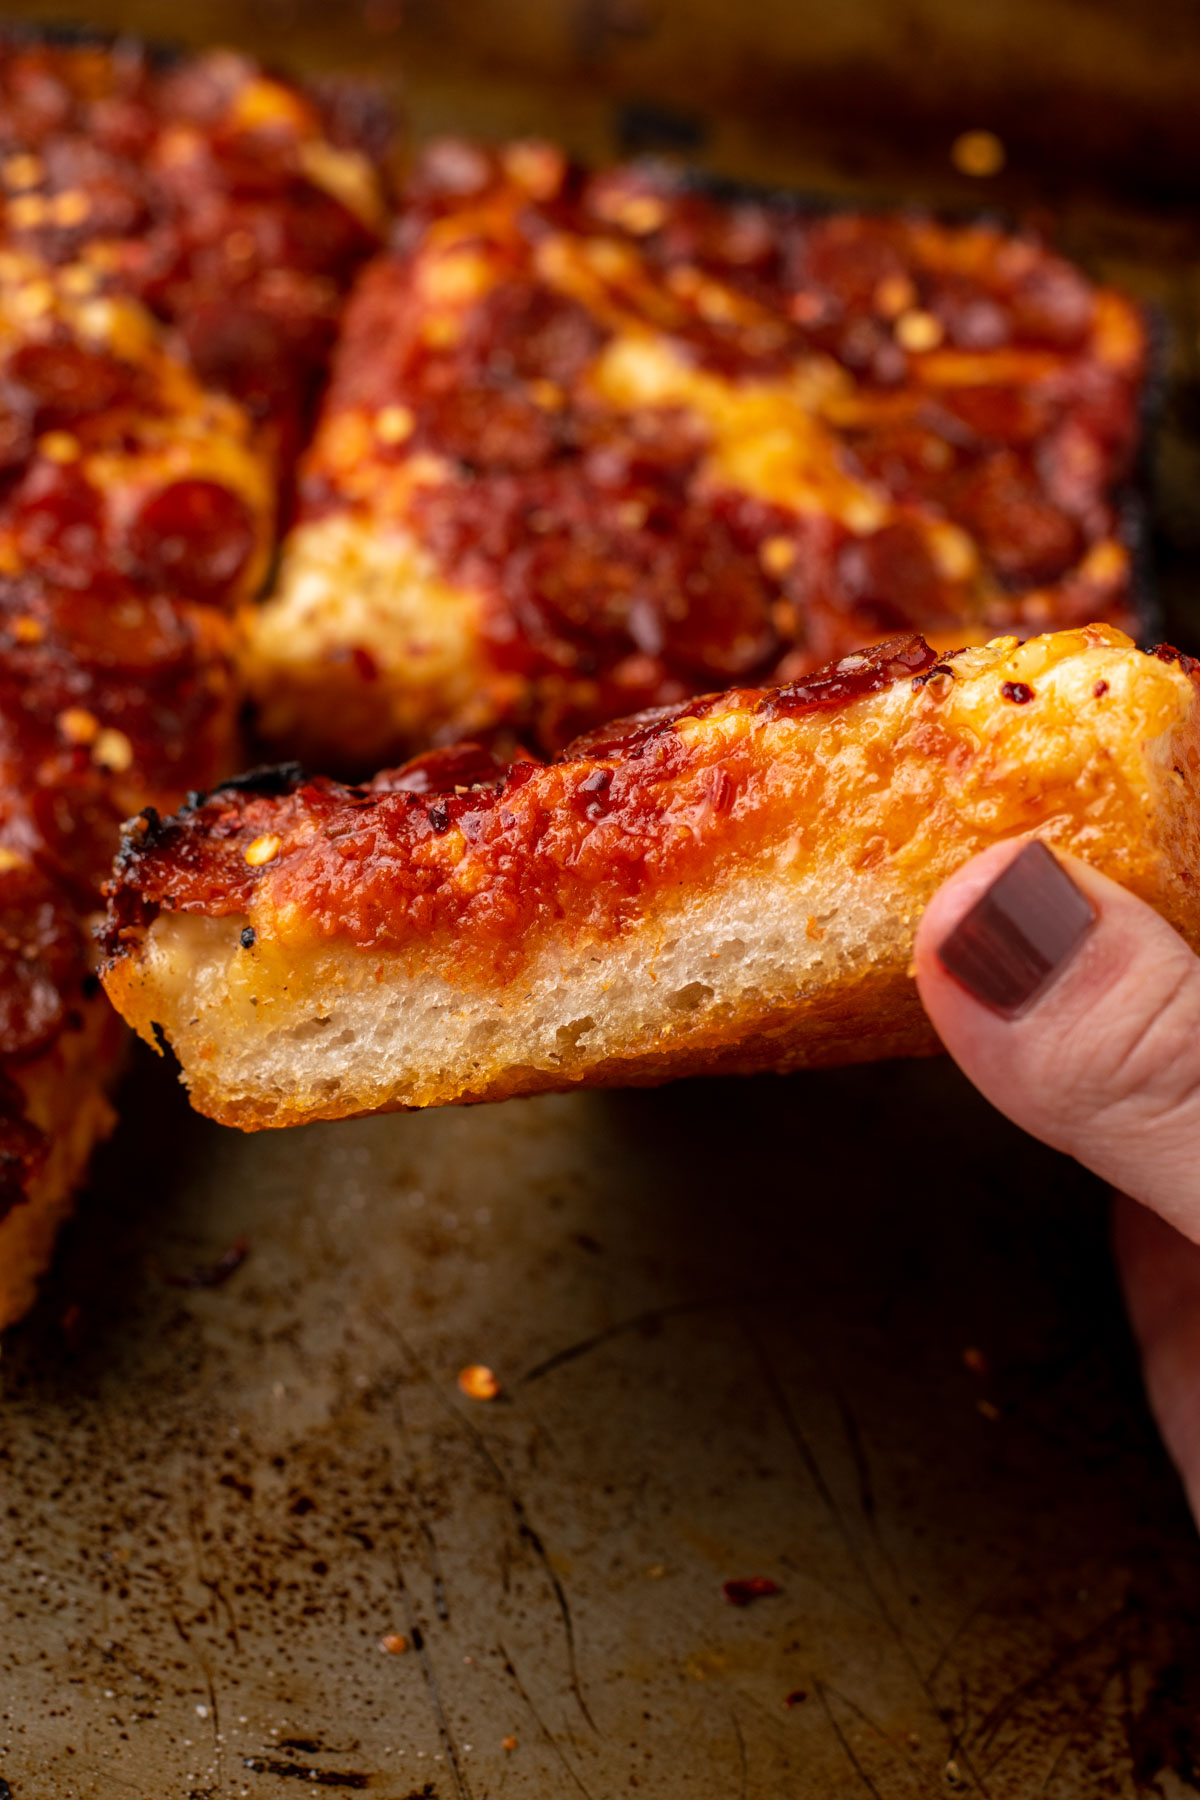
Detroit style pizza is known for its classic rectangular shape and chewy yet crispy crust. It is almost like a focaccia—fluffy and thick on the inside yet crispy on the outside thanks to lots of olive oil and a crispy cheese edge.
Detroit style pizzas typically see the cheese layered first, and then stripes of tomato sauce and additional toppings like pepperoni cups. You know when the pepperoni curls up and forms a little cup of grease? That's the best part.
The most iconic type of cheese used on a Detroit style pizza is Wisconsin brick cheese, a young and semi-hard cheese from, well, Wisconsin.

Why You'll Love This Recipe
- A hard to find gluten-free recipe. I mean, where have you seen gluten-free Detroit style pizza before?! Now we get to make it whenever we want!
- Mostly hands-off rising & cooking. This recipe is very easy to prep, with just about 20 minutes total of hands on kneading and topping.
- Delicious and super impressive. Your friends and family will be so impressed by the look and taste of this pizza. I bet they'll have no idea it's gluten-free! It's just that good.
Ingredients
Here is everything you'll need to make this gluten-free Detroit style pizza:

For the Crust
Instant yeast: I like to use instant because it's quick, but active dried yeast should perform similarly. Just ensure you give it a good 10-15 minutes to sit with the sugar and water to foam and activate.
Granulated sugar: This is my preferred sugar to feed the yeast. Alternatively, you could use honey or your favourite sugar.
Warm water: It is important that the water is warm to the touch, not hot. Hot water will kill the yeast and cold water won't activate it enough. A nice happy medium is that it feels warm when you touch the water with your finger.
Apple cider vinegar: This is an ingredient that I like to add to my gluten-free breads for extra airy-ness and softness. Apple cider vinegar (or you could use white vinegar), creates an acidic environment for the yeast which encourages growth. This in turn leads to fluffy and not dense gluten-free breads and doughs.
Olive oil: The crust of Detroit style pizza is very reminiscent of focaccia bread. This means there is olive oil in the dough and lots used to prevent the dough from sticking to the bowls or pan. It's what gives the pizza it's characteristic crispy crust.
Gluten-free flour: As I'm writing this, the only flour that I recommend for this recipe is the Mulino Caputo Fioreglut gluten-free flour. See the below section on flour to learn why it's so unique and important.
Salt: Of course every good dough needs salt.
Topping Suggestions
Of course you can use any toppings you enjoy, such as veggies, meats, more cheeses, etc. These are some of the most traditional Detroit style pizza toppings and the ones I used in these images:
- Shredded mozzarella or the traditional Wisconsin brick cheese
- Marinara sauce
- Sliced pepperoni medium thickness! This and using a pepperoni with natural casing are the top tips to achieve the iconic pepperoni cup. Learn more about pepperoni cupping in this extremely detailed article from Serious Eats.
- Honey to drizzle. Or you can buy hot honey from Mike's.
- Chili flakes to taste
- Dried oregano to taste
Other Flavour Combinations
- Veggie. Top the cheese and sauce with mushrooms, green pepper, onion, tomato slices, olive, etc. Put your favourite veggies right on top then bake.
- Meat lovers. Think pepperoni, sausage, bacon, salami... the options are endless. Ensure the meats are pre-cooked.
- Hawaiian. Ham & pineapple—are you team pineapple on pizza?
- Or just plain cheese!

What Gluten-Free Flour to Use
Please note that the only flour I currently recommend for this recipe is the Mulino Caputo Fioreglut gluten-free flour. This flour is absolutely incredible for gluten-free yeasted doughs and breads because it contains gluten-free wheat starch which gives it amazing elasticity and workability. Yes, it is safe for celiacs. To learn more about gluten-free wheat starch, read this informative article from Wheat by the Wayside.
Unfortunately, it can be expensive and hard to find. Amazon carries it for $30 CAD per bag (1 kg), which is INSANE! No one should be paying that but unfortunately, it is the most accessible option. I purchase mine at local Italian stores, where a good price is $12 CAD a bag (1 kg). It is imported from Italy so those will be your best bet. Call around!
Note that I have tried this recipe with the Bob's Red Milll 1:1 Baking Flour. Yes, it states that the flour is not meant for yeasted bread, but I thought I had a hack to make it work by incorporating some psyllium husk. It did not work. The crust didn't cook through, was raw, gummy, and gross. So unfortunately at this time I do not have another flour substitution. I hope to develop my own blend that is comparable soon!
Substitutions
While this recipe was developed with optimal flavour pairings, here are some substitution suggestions:
- Dairy-free. The focaccia style crust is naturally dairy-free. To keep the whole pizza dairy-free or vegan, top with your favourite dairy-free cheese. Note that since dairy-free cheese can sometimes have trouble melting, you may want to do a thin layer of marinara sauce on the dough, then sprinkle the cheese and toppings on top like normal.
- Flour. Mentioned in the above section, the only flour that I have tested and can recommend for this recipe is the Mulino Caputo Fioreglut gluten-free flour. It contains gluten-free wheat starch (safe for celiacs), and gives results unlike any other flour. I hope to continue further testing and will update when any other flour is comparable in this recipe.
- Toppings. See the above toppings section for inspiration! Try veggies, meat, or the classic pepperoni and hot honey.
Equipment
Detroit style pizza is known for its square or rectangular shape. In this recipe, I recommend using a square metal 8x8" or 9x9" pan. Metal is best because it will conduct heat, encouraging the bottom of the pizza to cook through.
You can also make this recipe in a 12" cast iron skillet or a 9x13" baking dish (ideally metal). Because these are larger pans, please double the recipe quantities. This will serve 4-8 people.

Step-by-Step Instructions
Be sure to read the recipe card below for the full ingredient list and instructions.
(1) In a large bowl, stir together the yeast, sugar, and warm water. Let it sit for 10 minutes. It should look foamy and smell yeasty.
Pour in the apple cider vinegar, olive oil, half of the flour, and salt. Mix with a fork in the bowl, then add the remaining flour and knead on the counter once it gets too thick. Gently knead until all flour is combined and the dough is smooth.
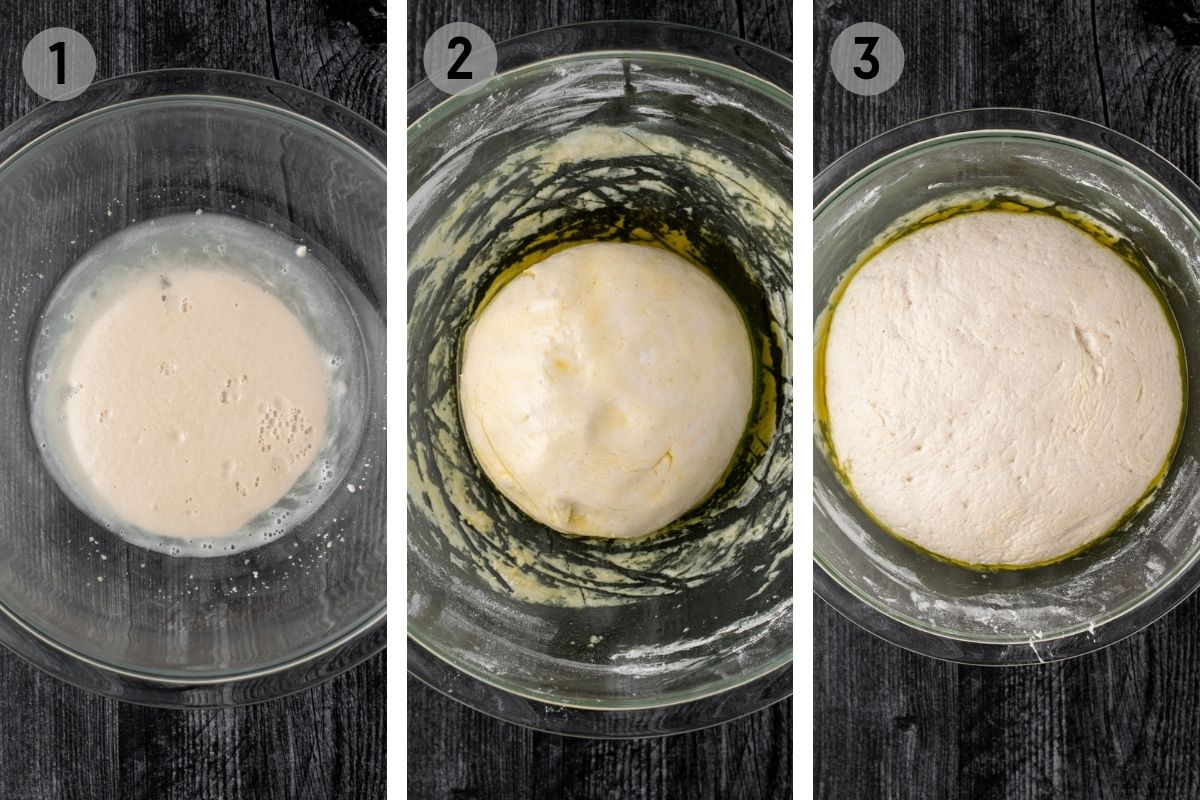
(2) Before Rising. Grease the large bowl with some olive oil, place the dough ball in, cover with a towel and let it rise in a warm place for about 1 hour to 1 hour and 15 minutes. A cold oven is a great place for this to avoid drafts.
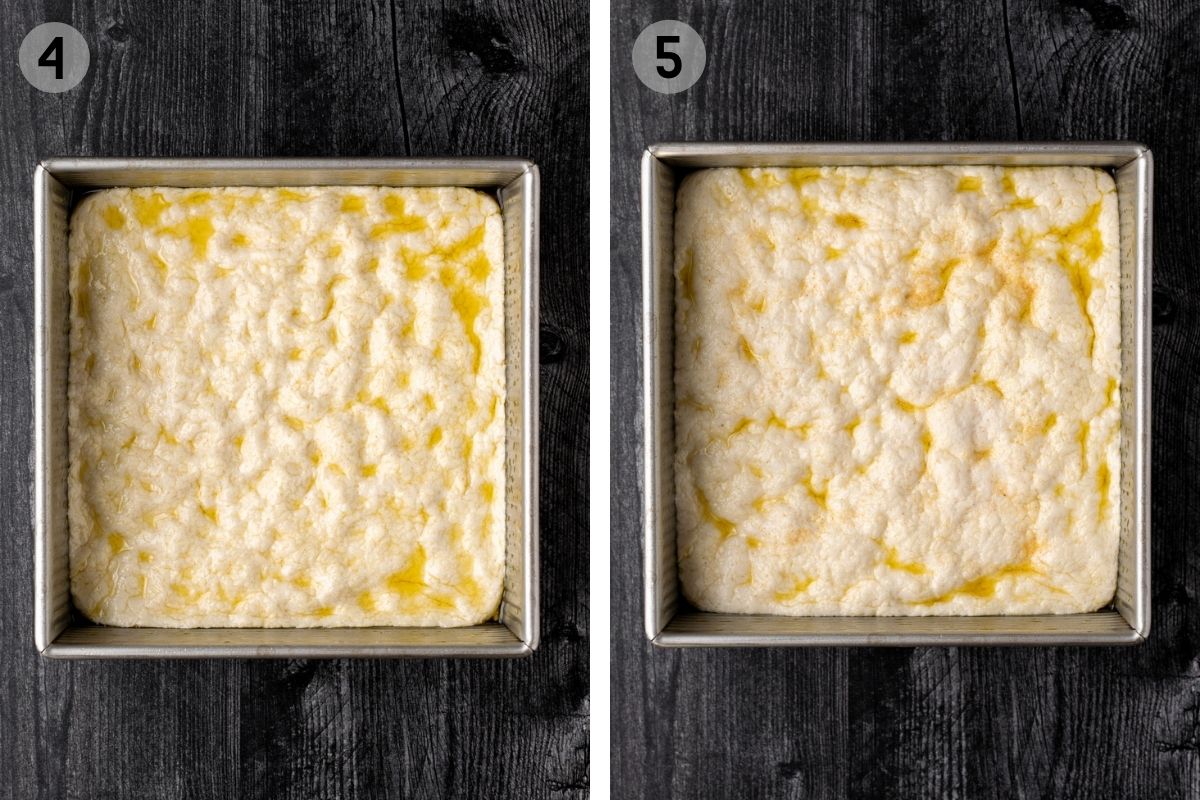
(3) After Rising. Once the dough has risen, oil a square (8x8" or 9x9") metal baking dish and place the dough inside. Use your fingers to spread and dimple the dough, then cover with a towel and let it rise for another 30-45 minutes. With 15 minutes remaining, preheat the oven to 500ºF. Ensure you remove the dish if the dough was rising in the oven!
(4) Before Rising & (5) After Rising.
(6) Once risen, spread the cheese over the dough to the edges of the pan. Yes, cheese first! Then top with diagonal lines of marinara sauce and pepperoni slices.
Bake for approximately 25 minutes on the bottom rack (the lowest it will go), depending on your desired level of crispiness. Yes, the edges of the cheese may burn slightly, but that's okay.
(7) Remove from the oven, and run a knife along the edges to loosen the pizza from the pan. Use a spatula to help remove the pizza, then use a sharp knife to slice into 4 squares. Top with a drizzle of honey, chili flakes, and dried oregano. Enjoy immediately!

How to Make a Larger Pizza (9x13")
If you wish to make a pizza that serves 4-6 people, I recommend doubling the written ingredient quantities and baking the pizza in a 9x13" pan or a 12" cast iron skillet. A metal pan is ideal for heat conduction, but use what you have. Alternatively, double the recipe and bake in two 8x8" square metal pans.
Make Ahead
To make the dough the night before, prepare according to the instructions until the end of the first rise. Cover the dough bowl with a lid or plastic wrap and refrigerate overnight. When ready to bake, remove the dough from the fridge and spread in an oiled baking pan. Let the dough come to room temperature during this second rise, about 45 minutes. Top and bake according to the instructions.
Storage
Storage Instructions: Leftover baked pizza can be cooled to room temperature and stored in the fridge in an airtight container. Reheat in the air fryer at 350ºF for 5-7 minutes, or the oven at 400ºF for 5-10 minutes.
Freezing Instructions: Please note that I do not recommend freezing raw pizza dough. Baked pizza slices may be cooled and frozen in an airtight container for up to 1 month. To reheat, place in a 450ºF oven for 7-10 minutes until crisp and hot. Timing may vary.

Expert Tips
Here are some of my top tips and tricks for successful gluten-free Detroit style pizza:
- Use the recommended gluten-free flour. I cannot speak for results when a flour other than Mulino Caputo Fioreglut is used. It is just incredible and produces a perfectly fluffy yet crispy crust!
- Don't rush the rise. I've given the rising times as ranges. If you're looking for a specific time, use the shorter time. If you're busy doing other things and it ends up being the later time in the range, that's okay. But stick to the recommended timings. Under or over proofing dough can lead to sub-optimal results.
- Layer cheese then sauce. Placing the shredded cheese directly on top of the pizza dough prevents a soggy crust by acting as a barrier between the sauce and the dough. And it's the classic Detroit style way!
- Don't worry if the edges look burnt. Cause they probably are, but it's FLAVOUR! Spreading the shredded cheese all the way to the edges creates a beautiful crispy cheese crust.
- Enjoy immediately! Gluten-free Detroit style pizza is best when served hot.

Frequently Asked Questions
Typically, Detroit style pizza is not gluten-free. The crispy, focaccia-like crust usually contains wheat flour. But this recipe is gluten-free!
I recommend using Mulino Caputo Fioreglut gluten-free flour. It contains wheat starch with the gluten removed (and yes it is celiac-safe). This allows it to produce wonderful breads, very reminiscent of the properties of gluten. I recommend looking for it locally at Italian stores, as Amazon is extremely expensive. At this time, I do not recommend swapping for another gluten-free flour.
Layering the cheese under the sauce is a classic technique used in Detroit style pizzas. As the fluffy focaccia-like crust is very thick and soft, layering the cheese and then the tomato sauce prevents a soggy crust.
Chicago pizza is typically made with a thin, crispy deep dish crust, similar to a pie. It is often baked in a deep circular springform pan, built for multiple layers of toppings. Detroit style pizza is completely different. Often baked in a square or rectangular pan, Detroit style pizza has a fluffy focaccia-like crust that is crispy on the outside.

This gluten-free Detroit style pan pizza is fluffy, crispy, and loaded with flavour. You will be shocked that something so amazing can be gluten-free! Your friends and family will not be able to tell the difference. I hope you enjoy this delicious treat!
More Recipes You'll Like:
- Gluten-Free Focaccia Bread
- Gluten-Free Pizza Hot Pockets
- Homemade Gluten-Free Bagels
- Fig & Prosciutto Pizza
Related Recipes


Have you made this gluten-free Detroit style pizza? I'd very much appreciate it if you leave a 5-star ⭐️⭐️⭐️⭐️⭐️ review below, and tag me on instagram @fromoliviaskitchen!
Recipe

Gluten-Free Detroit Style Pizza
Equipment
- Square metal baking dish (8x8" or 9x9") See recipe notes for 9x13" pan
Ingredients
For the Crust
- 1 teaspoon instant yeast
- 1 teaspoon granulated sugar
- ¾ cup warm water
- 1 teaspoon apple cider vinegar
- 1 tablespoon olive oil plus extra for greasing the bowl and pan
- 1 ¾ cup mulino caputo fioreglut gluten-free flour at this time, I don't recommend any other flour
- 1 teaspoon salt
Toppings
- 2 cups shredded mozzarella or the traditional Wisconsin brick cheese
- ¾ cup marinara sauce
- ⅓ cup sliced pepperoni medium thickness
- Honey to drizzle
- Chili flakes to taste
- Dried oregano to taste
Instructions
- In a large bowl, stir together the yeast, sugar, and warm water. Let it sit for 10 minutes. It should look foamy and smell yeasty.
- Pour in the apple cider vinegar, olive oil, half of the flour, and salt. Mix with a fork in the bowl, then add the remaining flour and knead on the counter once it gets too thick. Gently knead until all flour is combined and the dough is smooth.
- Grease the large bowl with some olive oil, place the dough ball in, cover with a towel and let it rise in a warm place for about 1 hour to 1 hour and 15 minutes. A cold oven is a great place for this to avoid drafts.
- Once the dough has risen, oil a square (8x8" or 9x9") metal baking dish and place the dough inside. Use your fingers to spread and dimple the dough, then cover with a towel and let it rise for another 30-45 minutes. With 15 minutes remaining, preheat the oven to 500ºF. Ensure you remove the dish if the dough was rising in the oven!
- Once risen, spread the cheese over the dough to the edges of the pan. Yes, cheese first! Then top with diagonal lines of marinara sauce and pepperoni slices.
- Bake for approximately 25 minutes on the bottom rack (the lowest it will go), depending on your desired level of crispiness. Yes, the edges of the cheese may burn slightly, but that's okay.
- Remove from the oven, and run a knife along the edges to loosen the pizza from the pan. Use a spatula to help remove the pizza, then use a sharp knife to slice into 4 squares. Top with a drizzle of honey, chili flakes, and dried oregano. Enjoy immediately!
Notes
- Flour: At this time, I don't recommend any flour other than the Mulino Caputo Fioreglut gluten-free flour. Try to find it at a local Italian store, as Amazon can be expensive.
- Dairy-Free: This Detroit-style crust is naturally dairy-free. If using dairy-free cheese, I suggest layering it on top so it has the best chance to melt.
- Topping Suggestions: Veggies, meat lovers, or Hawaiian style toppings would be great on this crust.
- To Make a Larger Pizza (9x13"): Double the written ingredient quantities and bake the pizza in a 9x13" metal pan. Alternatively, double the recipe and bake in two 8x8" square metal pans. Serves 4-8.
- Make Ahead: Prepare according to the instructions to the end of the first rise. Cover the dough bowl and refrigerate overnight. When ready to bake, remove the dough from the fridge and spread in an oiled baking pan. Let the dough come to room temperature during this second rise, about 45 minutes. Top and bake according to the instructions.
- Storage: Leftover baked pizza can be cooled to room temperature and stored in the fridge in an airtight container. Reheat in the air fryer at 350ºF for 5-7 minutes, or the oven at 400ºF for 5-10 minutes.
- Freezing: I do not recommend freezing raw pizza dough. Baked pizza slices may be cooled and frozen in an airtight container for up to 1 month. To reheat, place in a 450ºF oven for 7-10 minutes until crisp and hot. Timing may vary.
Amy says
Absolutely delicious!
Olivia Parsons says
Thanks so much Amy! I'm glad you enjoyed the pizza!
Trish says
Absolutely amazing!!!
Cheryl Thomas says
This was the most delicious pizza I’ve ever made! It was so airy, yet crispy on the bottom. Even my mom-GF family members loved it. The drizzle of honey took it over the top. Thanks for sharing a great recipe.
Olivia Parsons says
I'm so glad your family enjoyed this pizza, Cheryl! Thanks for the kind review!
Conor says
It's disconcerting how bouncy, crusty, chewy, and perfect the recipe worked on the first try--caputo fioreglut gluten free flour is the one true gluten free flour.
Olivia Parsons says
I'm still shocked how fluffy this pizza is! Absolute favourite!
Christine says
This is hands down the best gluten free pizza I have ever had and I’ve been gluten free for about 5 years now which means I e tried a lot of pizza ! Lol this is my new go to pizza and it is so worth making !! I’m in heaven! Thank you for this recipe!! For those of you who haven’t tried it yet, I highly recommend you stop missing out on the best gluten free pizza on earth!!
Olivia Parsons says
Thank you so much for this Christine! I am sooooo glad you enjoyed!
Mien says
Loved this recipe! I only had a 13x9 metal pan so I doubled the recipe as suggested and it turned out a little “bready” and a little tough instead of chew. Any suggestions?
Olivia Parsons says
Hi Mien, did you use the recommended flour blend? It is essential for this recipe. This also sounds like too much flour could have been used, or not enough time rising.
Donna Cooper says
I am so excited to try this. I just have a question about using the lowest rack in the oven and a temperature of 500. Isn’t it going to burn too much?? Thanks so much for sharing this recipe. I’m so excited. I am going to check out all your GF recipes. Thanks again.
Olivia Parsons says
That is correct! This is a thick crust so the high temp and bottom rack (+ metal pan) are needed for the crust to cook all the way. Enjoy!
Kasey K says
We love Caputo Fioreglut Flour and very happy we found this recipe. I mixed it in my stand mixer and was skeptical once I moved the dough to the 8x8, but when I pulled it out of the oven 25 minutes later, I realized how wonderful it really is! Fluffy, thick, pizza that is crisp on the bottom & sides, yet soft in the center. It was a wonderful experience! We will do it again soon, but I'll double the cheese, slather the top (and maybe bottom?) with garlicy butter, and then probably a little more cheese. A++, and can't wait to do it again!
Olivia Parsons says
Thanks so much for the review Kasey! It really is an incredible flour eh!
Chris says
Dough seems very wet is this right
Olivia Parsons says
The dough is not overly wet, as seen in the step by step photos in the post. The ONLY flour recommended for this is Caputo Fioreglut, any other will not have the same texture.
Joanna says
I have made the focaccia using the Caputo fioreglut gf flour, but I want to try your pizza recipe. Do you have a gram weight measure so I don’t use too much flour? I have the special Detroit rectangular pan approximately 9” x 13” as well as the smaller 8” x 10” Detroit metal pan to make both focaccia and pizza recipes with fioreglut flour.
Olivia Parsons says
Hi Joanna—I am not as familiar baking in grams but I understand it is much easier! By my calculations 1 3/4 cup should be about 210g. Please see the process photos to ensure your dough is the correct texture. And see note if you want to make a 9x13". Enjoy!
MeganS says
I'm going to try and find the same flour without soy (son is highly allergic), or try this with another GF flour blend that has the wheat starch. I'll report back!
Olivia Parsons says
Hi Megan, I wish you the best of luck. Please note that Caputo Fioreglut is the ONLY flour that I recommend for this recipe for me. Please do let me know if another blend contains wheat starch and works.
Ashley says
Can’t even tell is gluten free!!!
MeganS says
We ended up getting the same recommended flour from Amazon - that package didn't list soy as an ingredient, contrary to Caputo Fioreglu's website that listed it in their ingredients.
I can't figure out what I did wrong, after double checking to make sure we followed things correctly. The first rise (we left it in the fridge overnight to cook the next evening) didn't really happen, the ball didn't grow in size. The dough was really tough to work with from the fridge and I had to keep warming up my hands. I was afraid to let the ball sit to room temperature before putting in the pan in case it did actually rise but in the wrong way (and the instructions said to get it in the pan before the second rise). We worked it and worked it, then put into pan, using fingers to spread and dimple. For the second rise (which ended up being 1 hour 5 mins instead of 45mins), only one small portion seemed to puff up and the rest stayed flat. We baked it at 500 for 20mins on the lowest rack, the side were burnt, the pepperoni were burnt and the rest seemed cooked through, so we took it out. It was flavorful and smelled yummy. some of the dough was doughy, but most of the bottom was hard as a rock and inedible. Maybe we should have covered loosely with foil to stop the burning, but continue the cooking?
Olivia Parsons says
Hi Megan, it sounds like your yeast could be expired which would explain little rise. I really do recommend making this pizza dough fresh on the day of for best results. Before baking it should rise at room temperature.
Susan says
Are any of the caputo fioreglut flours okay to use? It's impossible to get the 'mulino' flour.
Olivia Parsons says
There is just one caputo fioreglut, but I think we are talking about the same thing. It is in a brown bag and states gluten free flour. Mulino caputo has transitioned to being known as just caputo.
Sean says
I was planning on using the 9x13 dish since it is what I have already. Besides doubling the recipe do you think there would be any other changes(longer wait for dough to rise, longer in oven, etc.)
Thank you
Olivia Parsons says
I have not doubled the recipe myself, but others here have successfully cooked the pizza in a 9x13" pan. Rise and cook times should be roughly the same.
Sean says
Legit the best gluten free pizza I've had. My wife who has celiac agrees. Will definitely be bookmarking this site.
Thank you!
Maria M says
Thank you for this!!! My dough is doing its second rise in the pan, and I can hardly wait... question... my oven is gas, and the heating element is on top and in the back... not on the bottom. Do I still need to bake on the lowest rack? I imagine that is normally what you'd do to get it extra crispy on the bottom? Which I guess just won't be happening due to my oven.
Olivia Parsons says
Hi Maria—I have not baked this in a gas oven, but I would still place it in the middle rack so the bottom crust can cook before the toppings melt.
Bree says
King Arthur flour now makes two gluten free flours that use gluten free wheat starch and have psyllium husk in them (a bread flour and a pizza flour). Have you had a chance to try this recipe with one of those flours? I can get the King Arthur flour locally.
Olivia Parsons says
Unfortunately I do not have access to those flours in Canada. They sound promising. Please let me know if they work out in this recipe!
Bree says
When substituting, do you think I should use an equal volume of the King Arthur flour? Or an equal weight? It looks like a cup of the KA flour weighs 120g.
Olivia Parsons says
I have not worked with this flour, but try to substitute by the quantities written in the recipe. Start slow and look to see if your dough has the same texture as the process pics.
Bree says
I tried it out today with the King Arthur flour and it worked great! I could knead the dough and it came out with good texture/no gumminess. I should have had more oil in the bottom of the pan, but other than that, I call this a success!
Lynne says
So good! Crispy and delicious.
Olivia Parsons says
I'm so glad you enjoyed!
Loree says
Thank you for this recipe! I've been looking for a crispy, thick, Sicilian style pizza. I made this in an 8x8 as I thought the 9x9 would have made it too thin. The 8x8 seemed to come out just right. The cheese was getting a bit too cooked, so I covered with tinfoil after 20 minutes, turned the oven down a little and baked it for another 10 minutes. Then I turned the oven off, open the door slightly and let it sit for 5 minutes before taking it out an slicing. It was a little difficult separating the sides from the pan, but that might have been because I buttered the sides instead of using oil. I used avocado oil on the bottom. Overall, the crust was exactly that crispy, buttery taste I was hoping for. Thanks!
Olivia Parsons says
I'm so glad you enjoyed!!! Sounds fantastic! An 8x8 pan is what I use too 🙂
Terry Kelly says
Good pizza (followed the recipe to the letter) but the crust was tough and kind of bland. I cooked it around 28 minutes. Any suggestions?
Olivia Parsons says
Did you use the exact flour as described? Ensure the dough rises as seen in the pictures. Add more salt if you find it's not enough, but I always think this is the most flavourful pizza!
Missy says
I am from Detroit and this is as close as it can be (Buddy’s, Jets, Cottage Inn),…when you’re gluten free. I did everything by the book with the ingredients mentioned, including Wisconsin block cheese cubes and the pizza sauce recipe that was attached. I have a gas oven and it took me 37 minutes to get to the final result. Looked just like the picture. I would try baking the crust for 5 minutes before topping next time to see if I could get a better bake on the dough/crust. Absolute delight! Thrilled with the recipe. This flour is amazing. Thanks for the tip. Can’t wait to try it for other recipes.
Olivia Parsons says
Wow!!! The best review possible! Thanks for sharing and enjoy!
Jacob says
FYI I made this with presidents choice gluten free flower cause ain’t no way I’m paying double for a small amount of flower. And it worked fine. It has the same starch stuff you talked about.
Olivia Parsons says
Hm, last I checked that flour didn't contain psyllium husk. Glad to hear this recipe worked well for you!
Tami B says
This is an excellent recipe. Because I don’t love the flavor of straight Caputo, I subbed in 1/4 cup sorghum and that worked beautifully. The only other change was skipping the honey to avoid added sugar. The proofing and bake followed your recipe and were spot on.
My Celiac son and the rest of the family (who eat gluten) were blown away by how delicious this Detroit Style pizza was! Thanks for the recipe!
Olivia Parsons says
Thank you so much!!! So happy your family could enjoy!
Joe says
Great Receipe!!! I did a side by side comparison with Cup 4 Cup Gf flour and the Caputo and got very similar results.
Olivia Parsons says
Very much appreciate the comparison! Great to know.
M says
This GF recipe is unique in that it offers only volume measurements rather than weights.
The pictures look great unfortunately this was the first of ~25 GF pizza recipes we have tried since diagnosis to simply not work.
We ended up with a "pour-in-the-pan" pizza dough instead of anything remotely resembling a dough ball. I generally don't trust volume measurements for baking due to inconsistency at so many points (i.e. our random collection of measuring cups is likely different than those the recipe author has). Would it be possible for you to add weights to the recipe?
Based on the photos and comments would be happy to give it another chance with more precise dough instructions.
Olivia Parsons says
It is absolutely a goal of mine to include metric measurements on more recipes here. Apologies that the process will take some time! However, it sounds like something more went wrong here. Are you using the exact flour? Did you use cups to measure? This is not a super loose dough so it sounds like the water or flour measurement was off.
M says
Thanks for the reply, and I am pleased to report that despite the differences going into the pan--the pizza turned out amazing!! (I updated my rating). I used Caputo flour but think the difference was that I converted the volume measurements to weight (creature of habit sorry) based on nutritional labels. I was shocked that it cooked up so well with no par-bake, given the high water content. It was such a hit that we are going to make it again soon-- I will try to note the weights and share after we do. Then you can compare to when you get around to translating the recipes yourself. Thanks for the recipe and the blog
Jack says
Could you please share the weights that you used. we also use this method over volume.
Olivia Parsons says
I agree metric measurements are more accurate. I am slowly working through adding them to all posts, so for the moment I only have the volume measurements.
Shawn says
This is an outstanding recipe, thank you for sharing. I do have questions about doubling the recipe. I did that to make it in a traditional 10x14 Detroit style pizza pan. I used the recommended flour and followed your directions, but made the dough the day before baking. My dough looked great, it atleast doubled in size, however the crust was a little gummy after a 25 minute bake.
3 1/2 cups of flour seems excessive for this size crust. Have you tested this? Also can you please add gram measurements for the dough ingredients? I love your recipes! Thank you
Olivia Parsons says
I'm glad you enjoyed! I have not tested doubling the recipe as I only have the smaller 8x8" pan, though the amount of flour is correct. It's possible the doubled dough may be slightly thicker and need more time to cook. I am working on gram quantities for my recipes—thank you for your feedback.
Rachel says
This turned out great! I live in southern California and was able to find this flour at Sprouts (a health food grocery store) for $15. It was $50 on Amazon ! I followed the recipe exactly but my dough turned out a little too wet/sticky. I added slightly more flour and was able to get a dough ball. It turned out great at the end ! Will definitely be making this again. Thanks for the clear instructions 😀